Multiple Custom Elements in a Single Client Extension

Introduction:
The development methodology of Liferay DXP supports writing modular front-end applications through the use of Custom Elements (Web Components). Custom Elements are normally created in Client Extension (CX) files, and hence, allow extending functionality without changing the platform.
In the past, most developers thought that every custom element should be written inside a client extension. Nevertheless, recent advanced methodologies have shown that several custom elements can be written in one client extension file.
Prerequisites:
- Liferay DXP/Community
Environment Requirements:
- Java
- Liferay
- Node.js & Yarn
- Liferay Gradle Workspace
Note: Liferay uses a Gradle-based workspace to handle builds and package custom elements. This workspace will include all of your customizations and applications that need to be built, tested, and deployed to Liferay.
How to Implement Multiple Custom Elements in One Client Extension:
Step 1: Setting Up the Liferay Gradle Workspace
The first thing you need is a Liferay Gradle workspace. This workspace contains all necessary configurations and tooling to build and deploy custom elements (like React-based components) as Client Extensions.
- First, move into the client-extensions directory within your workspace
1cd liferay-workspace/client-extensions- Run the command below to get started: This is an npm package that helps you quickly create a ready-to-use React Client Extension for Liferay.
1npx create-liferay-react-cxStep 2: Create Multiple Web Component Classes in main.jsx
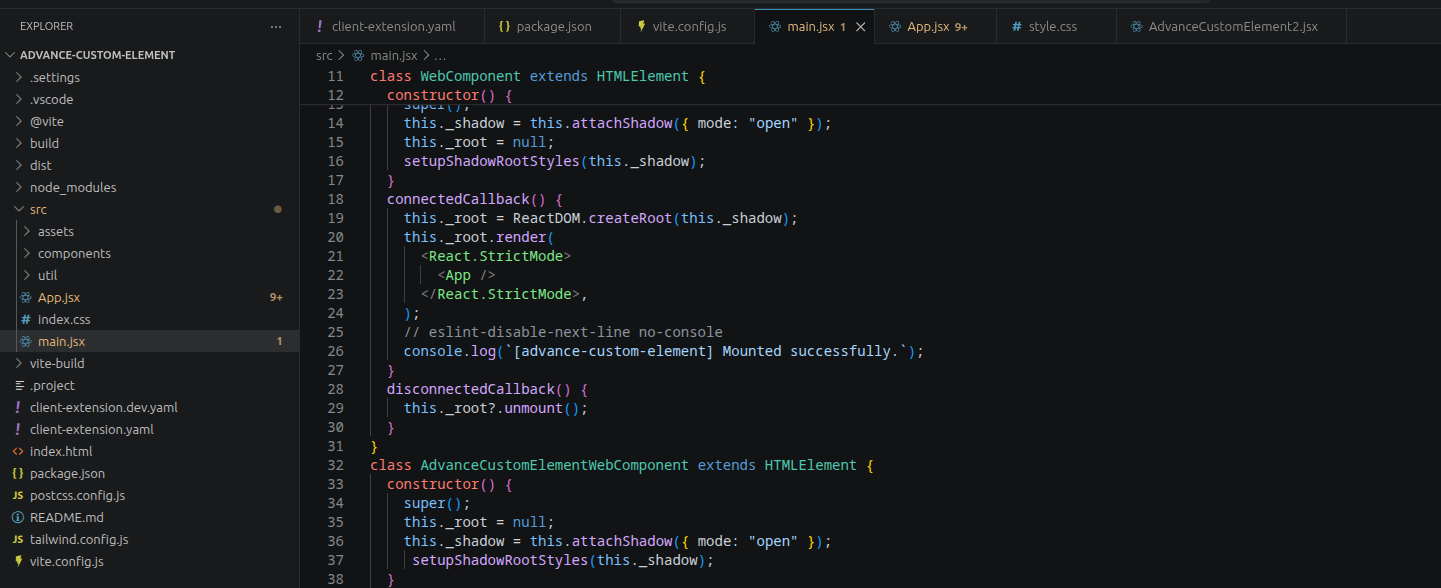
1class WebComponent extends HTMLElement {
2  constructor() {
3    super();
4    this._shadow = this.attachShadow({ mode: "open" });
5    this._root = null;
6    setupShadowRootStyles(this._shadow);
7  }
8  connectedCallback() {
9    this._root = ReactDOM.createRoot(this._shadow);
10    this._root.render(
11      <React.StrictMode>
12        <App />
13      </React.StrictMode>,
14    );
15    // eslint-disable-next-line no-console
16    console.log(`[advance-custom-element] Mounted successfully.`);
17  }
18  disconnectedCallback() {
19    this._root?.unmount();
20  }
21}
22class AdvanceCustomElementWebComponent extends HTMLElement {
23  constructor() {
24    super();
25    this._root = null;
26    this._shadow = this.attachShadow({ mode: "open" });
27     setupShadowRootStyles(this._shadow);
28  }
29  connectedCallback() {
30    this._root = ReactDOM.createRoot(this._shadow);
31    // use this.getAttribute() to get the values that will be
32    // passed to use as props on the custom element.
33    this._root.render(
34      <React.StrictMode>
35        <AdvanceCustomElement />
36      </React.StrictMode>,
37    );
38  }
39  disconnectedCallback() {
40    if (this._root) {
41      this._root.unmount();
42      this._root = null;
43    }
44  }
45}
Each class:
- Attaches its own Shadow DOM
- Initializes a React root
- Renders a different React component
Key idea:
Each custom element is independent, even though they live in the same file.
Use Shadow DOM + Shared Styling
1his._shadow = this.attachShadow({ mode: "open" });
2setupShadowRootStyles(this._shadow);
This ensures:
- Style isolation
- No CSS conflicts with the Liferay theme
- Reusable styling logic across elements
Step 3: Register Multiple Elements Safely
1const ELEMENT_NAME = "advance-custom-element";
2const ADVANCE_CUSTOM_ELEMENT_2 = "advance-custom-element-2";
3if (customElements.get(ELEMENT_NAME)) {
4  console.log(
5    `Skipping registration for <${ELEMENT_NAME}> (already registered)`,
6  );
7} else {
8  customElements.define(ELEMENT_NAME, WebComponent);
9}
10if (customElements.get(ADVANCE_CUSTOM_ELEMENT_2)) {
11  console.log(
12    `Skipping registration for <${ADVANCE_CUSTOM_ELEMENT_2}> (already registered)`,
13  );
14} else {
15  customElements.define(
16    ADVANCE_CUSTOM_ELEMENT_2,
17    AdvanceCustomElementWebComponent,
18  );
19}
Why this matters:
- Prevents duplicate registration errors
- Useful during hot reload / multiple script loads
Step 4: Define Multiple Custom Elements in client-extension.yaml
1assemble:
2    - from: vite-build
3      into: static
4
5# This is the import map entry so you can import the custom element in a custom fragment
6advance-custom-element:
7    bareSpecifier: advance-custom-element
8    name: advance-custom-element
9    type: jsImportMapsEntry
10    url: assets/index.js
11
12
13# This is the custom element definition
14advance-custom-element-element:
15    friendlyURLMapping: advance-custom-element
16    htmlElementName: advance-custom-element
17    instanceable: false
18    name: advance-custom-element
19    portletCategoryName: category.client-extensions
20    type: customElement
21    urls:
22        - assets/*.js
23    useESM: true
24
25# This is the second custom element definition
26advance-custom-element-element-2:
27    friendlyURLMapping: advance-custom-element-2
28    htmlElementName: advance-custom-element-2
29    instanceable: false
30    name: advance-custom-element-2
31    portletCategoryName: category.client-extensions
32    type: customElement
33    urls:
34        - assets/*.js
35    useESM: true
After creating multiple custom elements, deploy them into the Liferay server using the following command
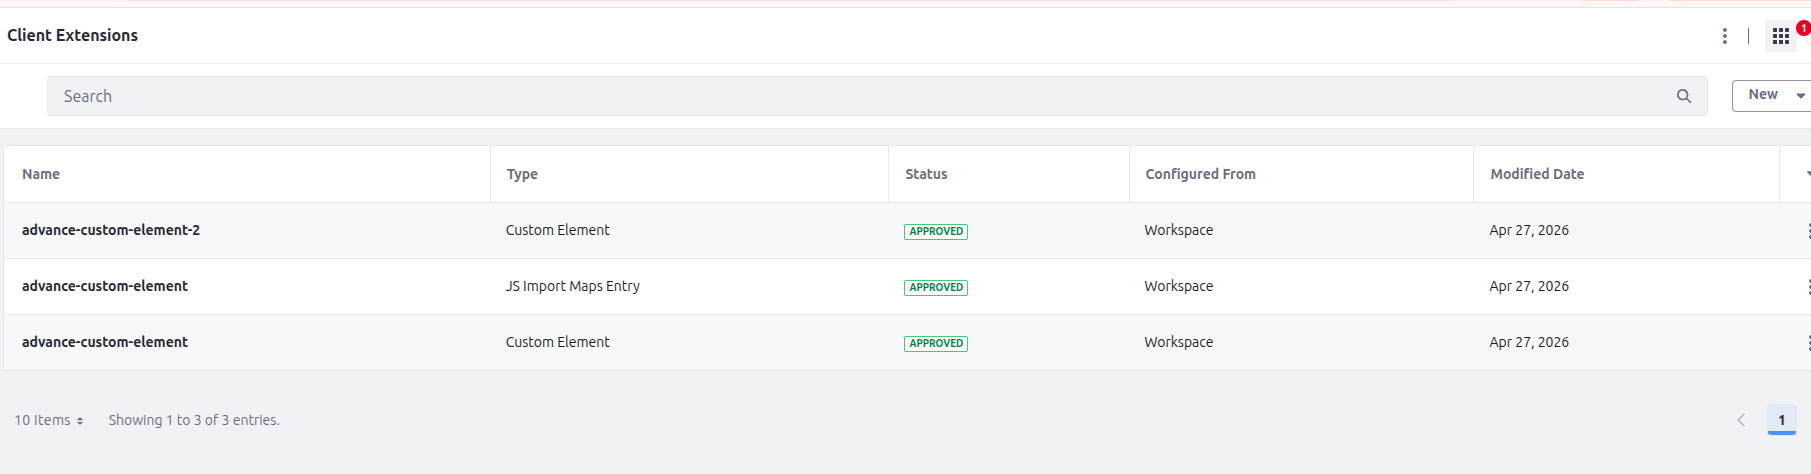
1../../gradlew clean deployAfter deployment, check them on the portal Global menu -> Applications -> Custom apps -> Client extensions, and we can also drop them into a page using the page builder

1<advance-custom-element></advance-custom-element>
2
3<advance-custom-element-2 ></advance-custom-element-2>
Why This Approach Works Well:
- Single deployment → fewer client extensions
- Shared dependencies → React, utils, styles
- Better performance → fewer network requests
- Cleaner architecture for related components
When to Use This Pattern:
- Components are related
- Dashboard widgets
- Comment system (list + form + reply)
- Shared logic exists
- Same APIs
- Same styling system
- Same state utilities
- You want optimized performance
- One bundle instead of many
Conclusion:
Your implementation shows a best-practice pattern for modern Liferay frontend development:
- Multiple Web Components
- Single Client Extension
- Shared bundle + shared dependencies
This approach aligns well with micro-frontend architecture, while still keeping deployment simple and efficient.