Custom Element Using Client Extension

Introduction
Liferay 7.4 introduced Client Extensions as a powerful way to extend and customize Liferay’s functionalities. Client Extensions are a modern, lightweight approach for front-end development, offering developers the ability to deploy and manage custom UI components, like React Custom Elements, without directly altering Liferay’s core structure. By leveraging these capabilities, developers can create highly dynamic and reusable components that integrate seamlessly into the Liferay ecosystem.
Prerequisites
- Liferay 7.4 (Community Edition or DXP)
- Java (JDK 11)
- Node.js & Yarn
- Liferay Gradle Workspace
Note : Liferay uses a Gradle-based workspace to handle builds and package custom elements. This workspace will include all of your customizations and applications that need to be built, tested, and deployed to Liferay.
Implementation of Custom Element Using Client Extensions
Follow the below steps to create a react based custom element using client extension
Step 1 : Setting Up the Liferay Gradle Workspace
The first thing you need is a Liferay Gradle workspace. This workspace contains all necessary configurations and tooling to build and deploy custom elements (like React-based components) as Client Extensions.
Step 2 : Creating a New React Project
For our custom element, we’ll use React to build a component that will be packaged and deployed in Liferay as a Client Extension.
- First, move into the client-extensions directory within your workspace:
1cd liferay-react-workspace/client-extensions- To create your React project, run the following command using Yarn:
1yarn create react-app my-react-app
Step 3 : Modify the React Project for Liferay
Once you have your basic React project, you need to make some changes so that it works as a custom element within Liferay.
1. Update package.json
The package.json file defines the name and dependencies of your project. One critical update is to ensure the name of the project is unique. Liferay uses custom element names across the platform, so make sure your element doesn’t conflict with others.
- Open package.json.
- Update the name field, making it unique:
1"name": "my-react-custom-element"2. Update index.html
By default, the root element in a React app is rendered into a div with the id root. For Liferay, we need to replace this with a custom tag.
- Open public/index.html.
- Replace the following:
1<div id="root"></div>With:
1<my-react-custom-element></my-react-custom-element>3. Modify React’s Entry Point
React’s default entry point code needs to be adjusted to ensure it behaves like a true custom element that can be added to a Liferay page. We’ll replace the default connection logic with something more dynamic.
- Open src/index.js.
- Replace the existing code with the following:
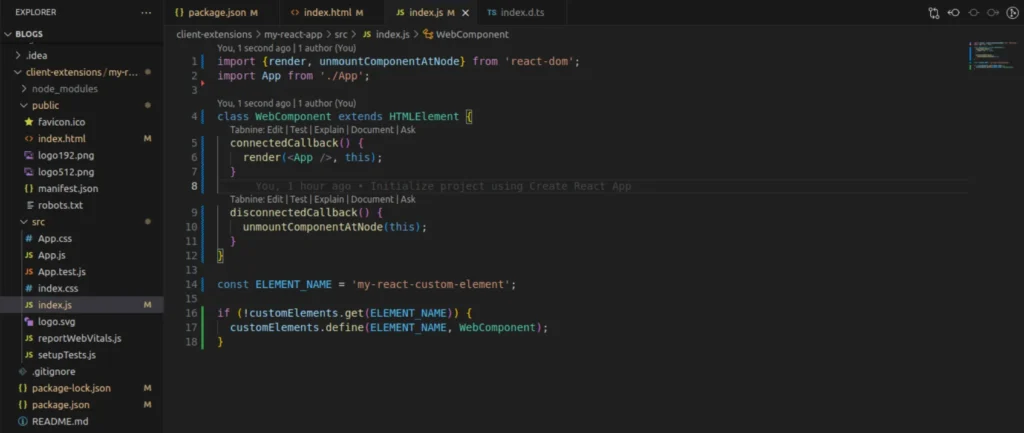
1import { render, unmountComponentAtNode } from "react-dom";
2import App from "./App";
3
4class WebComponent extends HTMLElement {
5  connectedCallback() {
6    render(<App />, this);
7  }
8
9  disconnectedCallback() {
10    unmountComponentAtNode(this);
11  }
12}
13
14const ELEMENT_NAME = "my-react-custom-element";
15
16if (!customElements.get(ELEMENT_NAME)) {
17  customElements.define(ELEMENT_NAME, WebComponent);
18}
First, we create a component called WebComponent, which extends the standard HTMLElement. It uses two key methods: connectedCallback() and disconnectedCallback(). These methods handle the custom React element when it is added or removed from a page.
When the custom element is added, the connectedCallback() method creates a new root element. Then, it uses React to render the application into this new root.
The disconnectedCallback() method runs when the custom element is removed from the page. This unmounts the React component, freeing up memory. Without this, repeated removal and addition of the element would cause memory leaks, eventually leading to browser performance issues.
Finally, we define the React custom element, so when the browser encounters the <my-react-custom-element> tag, it knows to use WebComponent for rendering the application.
Step 4 : Create the client-extension.yaml File
The client-extension.yaml file is what tells Liferay how to treat your React project as a Client Extension. This file is essential for deployment.
- In your client extension directory, create a file named client-extension.yaml with the following content:
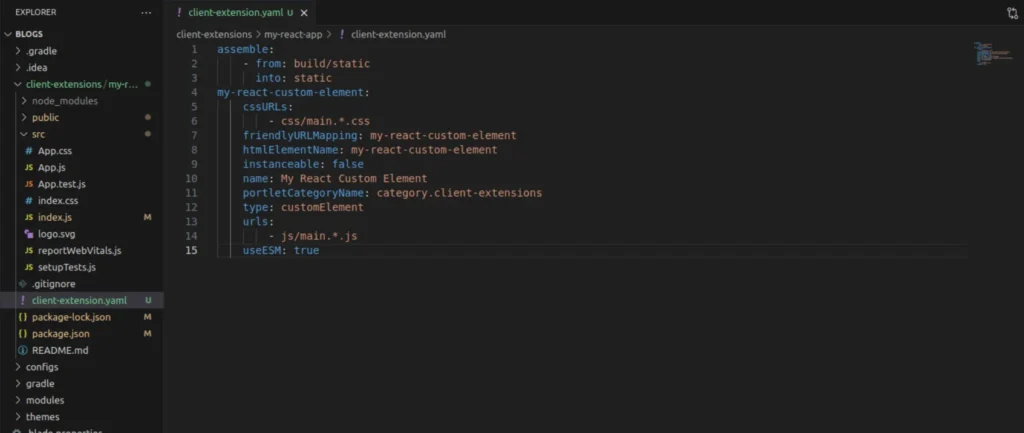
1assemble:
2    - from: build/static
3      into: static
4my-react-custom-element:
5    cssURLs:
6        - css/main.*.css
7    friendlyURLMapping: my-react-custom-element
8    htmlElementName: my-react-custom-element
9    instanceable: false
10    name: My React Custom Element
11    portletCategoryName: category.client-extensions
12    type: customElement
13    urls:
14        - js/main.*.js
15    useESM: true
This file defines how the custom element is bundled and deployed in Liferay. The urls field points to the generated JavaScript files, and the htmlElementName specifies the custom element tag to be used.
Step 5 : Build and Deploy the Client Extension
Before deploying the client extension we have to give our liferay server’s path so that it directly deployed on server.
First add the server path in liferay.workspace.home.dir
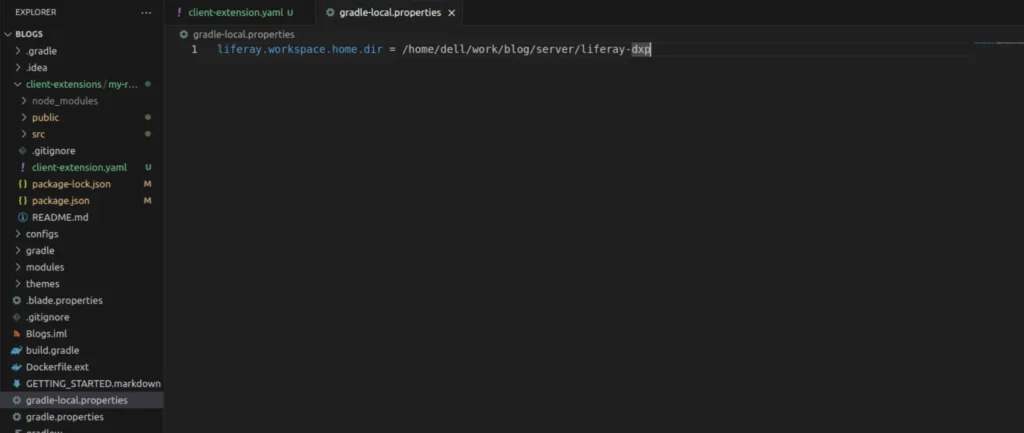
1liferay.workspace.home.dir = /home/dell/work/blog/server/liferay-dxpNow that your project is ready, it’s time to build and deploy it to Liferay.
Build the Client Extension
Run the following command from your project’s root directory:
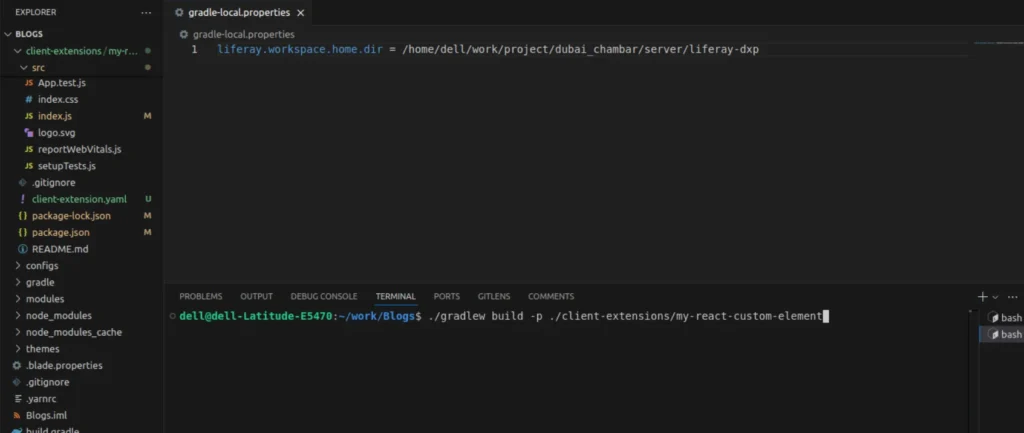
1./gradlew build -p ./client-extensions/my-react-custom-elementThis generates a ZIP file in the dist directory containing your React custom element. The file will be named my-react-custom-element.zip.
Deploy the Client Extension
You can now deploy the custom element to your Liferay instance. If you’re running Liferay locally, use the following command:
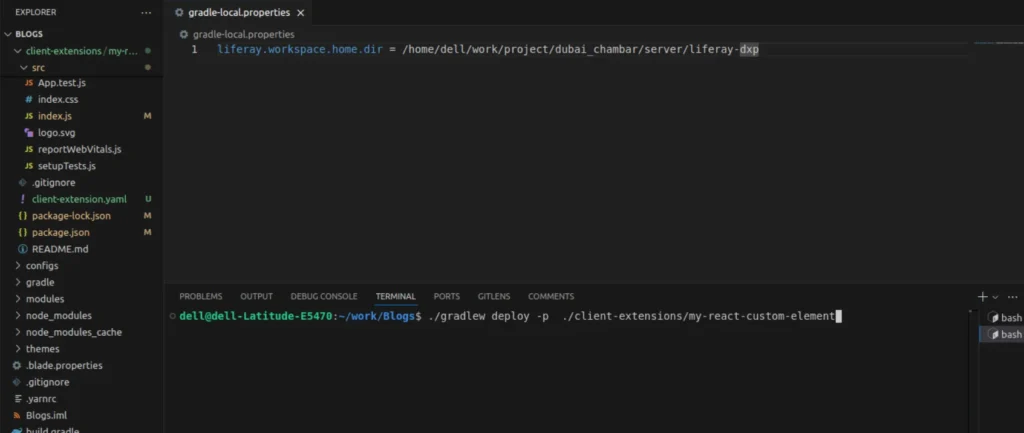
1./gradlew deploy -p ./client-extensions/my-react-custom-elementThis command places the client extension in the correct location (osgi/client-extensions) in Liferay’s bundle for deployment.
Note : Running gradlew deploy will automatically trigger the build process, as the deploy task depends on it. This means you don’t need to run gradlew build separately—gradlew deploy handles both building and deploying in one step.
Note : The -p option in Gradle stands for “project directory.”
For clean deployment, we would generally use the clean task like this:
1./gradlew clean deploy -p ./client-extensions/my-react-custom-elementThis command ensures that any previously built files are removed before running a fresh build and deployment.
Conclusion
Whether you’re an experienced React developer building an application for Liferay or a seasoned Liferay developer exploring React, this blog aims to give you the guidance needed to adapt your React app to run seamlessly on Liferay.
Now that your Liferay Gradle Workspace contains your React custom element, you’ll also find other client extensions in the directory, including some built with React and others with Angular. You can explore these examples or keep the workspace focused on your own custom React elements.