Data Migration Center in Liferay 7.4: Complete Guide to Import and Export Object Records

Introduction
Working with large amounts of data is a common requirement in many enterprise applications. During development or testing, there are situations where data needs to be moved from one environment to another. Sometimes teams also need to import existing business records into Liferay instead of adding everything manually.
Doing this record by record is not practical when the dataset becomes large. To handle this problem, Liferay provides the Data Migration Center feature in Liferay 7.4. It helps users import and export data using files such as CSV or JSON directly from the portal.
One useful thing about this feature is that developers and administrators can manage migration activities from the UI itself. There is no need to create separate database scripts for simple import and export operations.
In this blog, we will see how to enable the Data Migration Center, prepare migration files, import object data, and verify the migration results inside Liferay.
Prerequisites
- Liferay 7.4 or later version installed
- Administrator access to Liferay Portal
- Objects module configured properly
- CSV or JSON data files prepared for migration
- Required object definitions already created
- Proper field mapping knowledge
- Backup of existing production data
Environmental Requirements
| Requirement | Version |
|---|---|
| Java | JDK 11 or above |
| Liferay | Liferay 7.4+ |
What is Data Migration Center?
The Data Migration Center is a BETA feature in Liferay 7.4+ that provides a unified interface for managing data movement between Liferay instances or environments.
The Data Migration Center in Liferay is a centralized feature used to :
- Export application data
- Import structured datasets
- Create migration templates
- Manage reusable migration configurations
It simplifies moving data between the following :
- Development Environment
- UAT Environment
- Production Environment
- Different Liferay Instances
How to Enable Data Migration Center (Beta Feature)
By default, the Data Migration Center feature is disabled in Liferay.
Follow these steps to enable it :
Step 1 : Open Instance settings
Go to :
1Control Panel → Instance Settings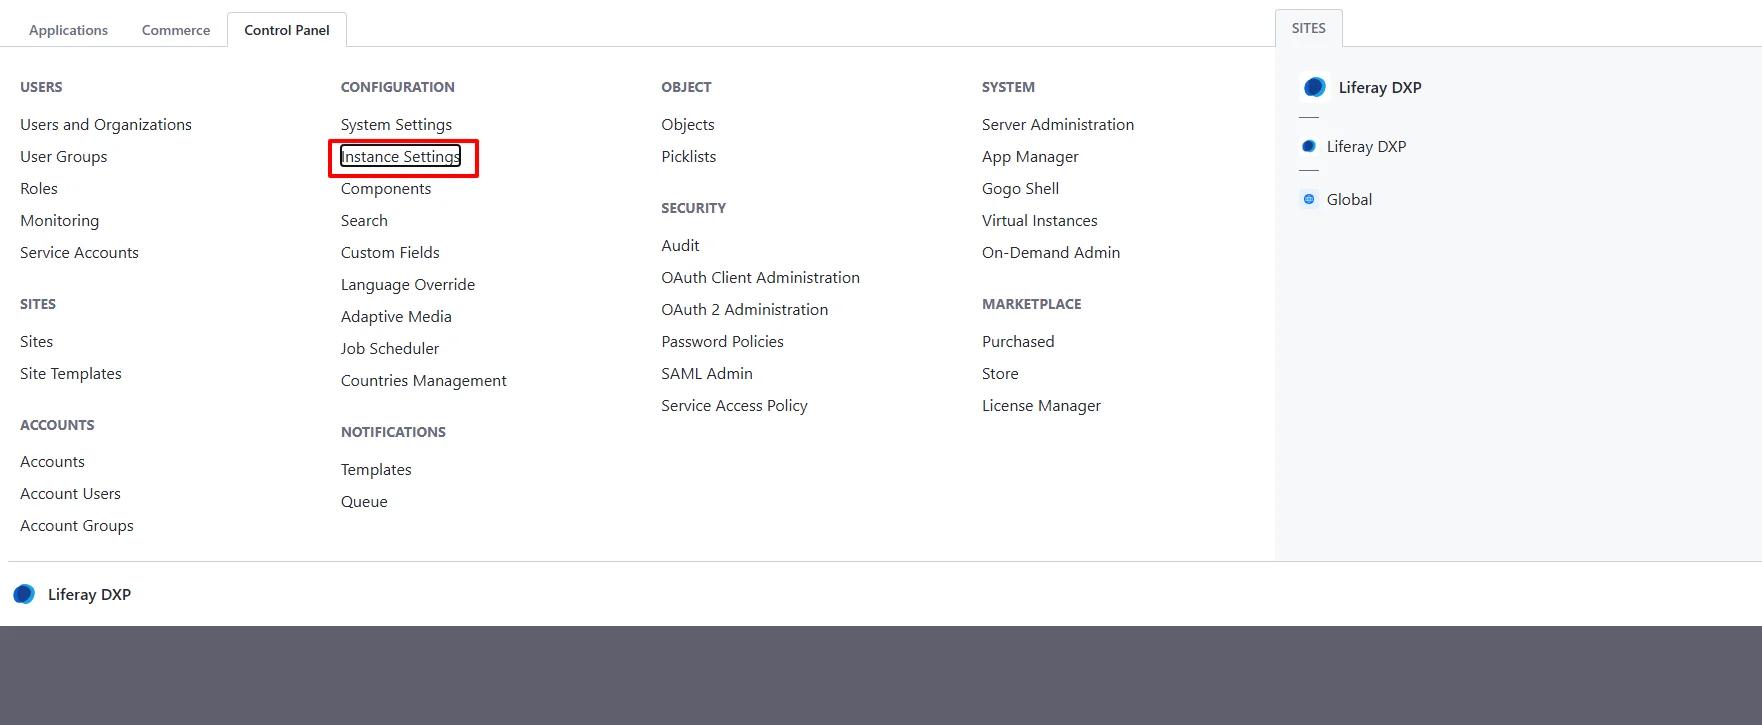
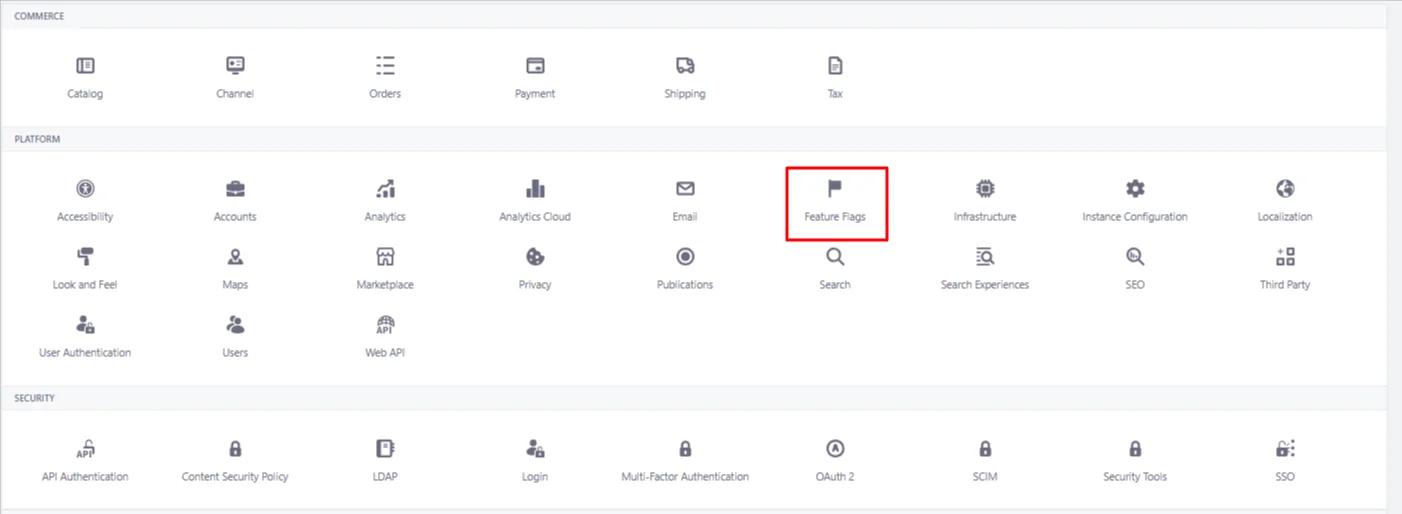
Step 2 : Search for Feature Flags
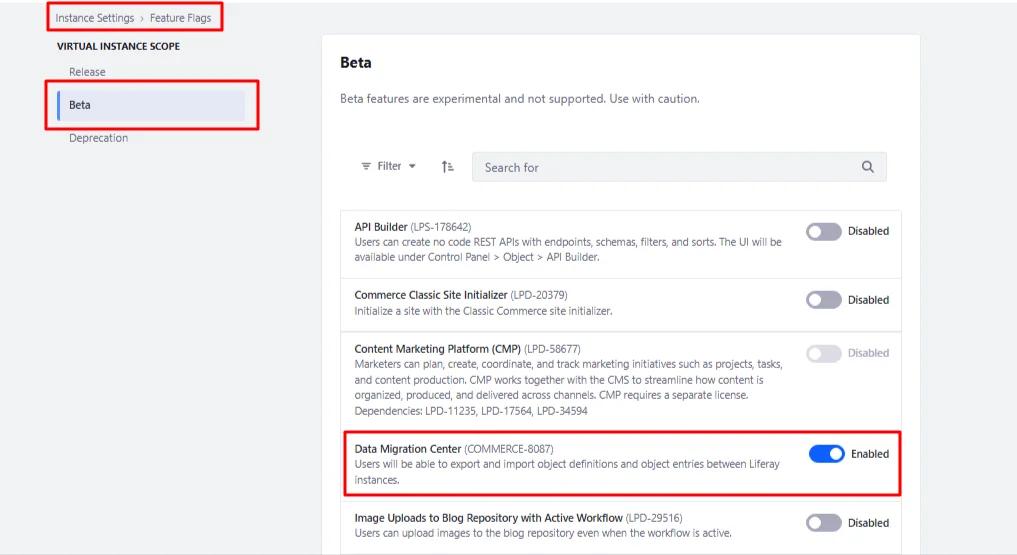
Step 3 : Enable Data Migration Center
Step 4 : Refresh or Restart
In some cases, you may need to :
- Refresh the portal
- Or restart the server
After enabling successfully, the feature will appear in :
1Global Menu → Applications → Data Migration Center
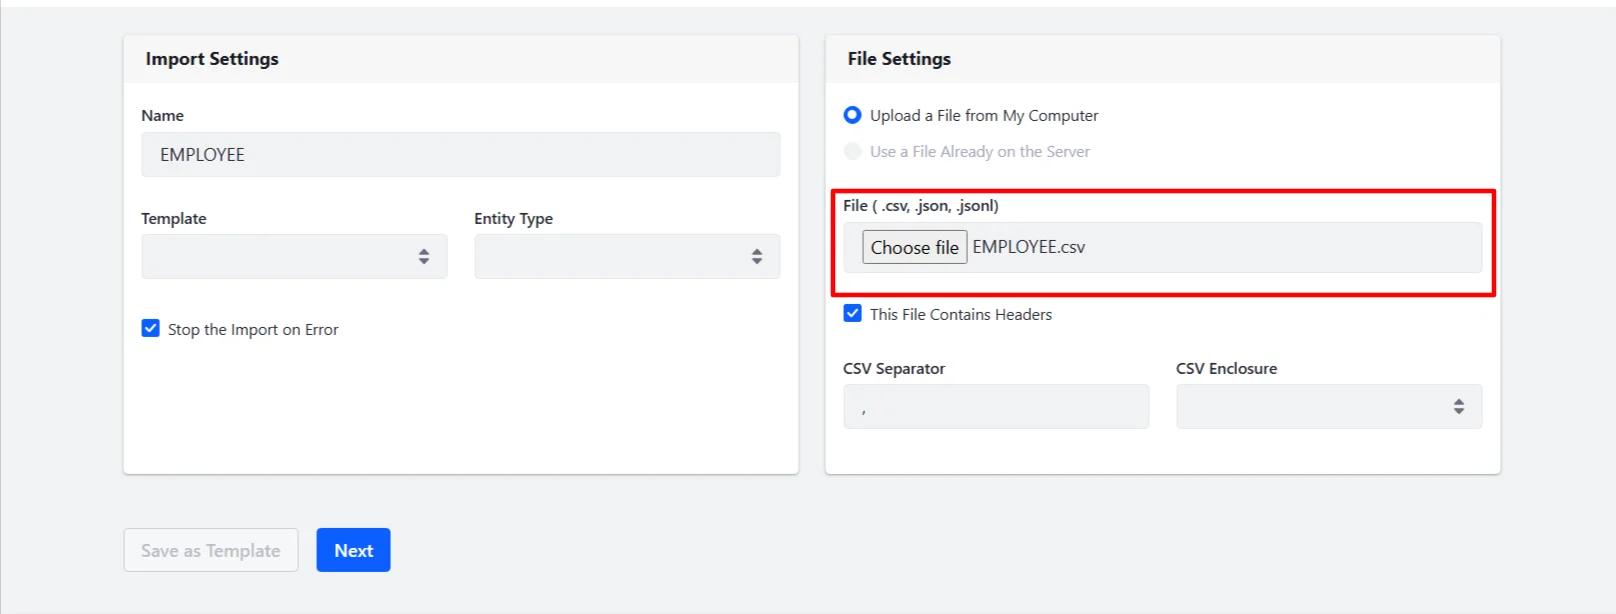
Create CSV File for Migration
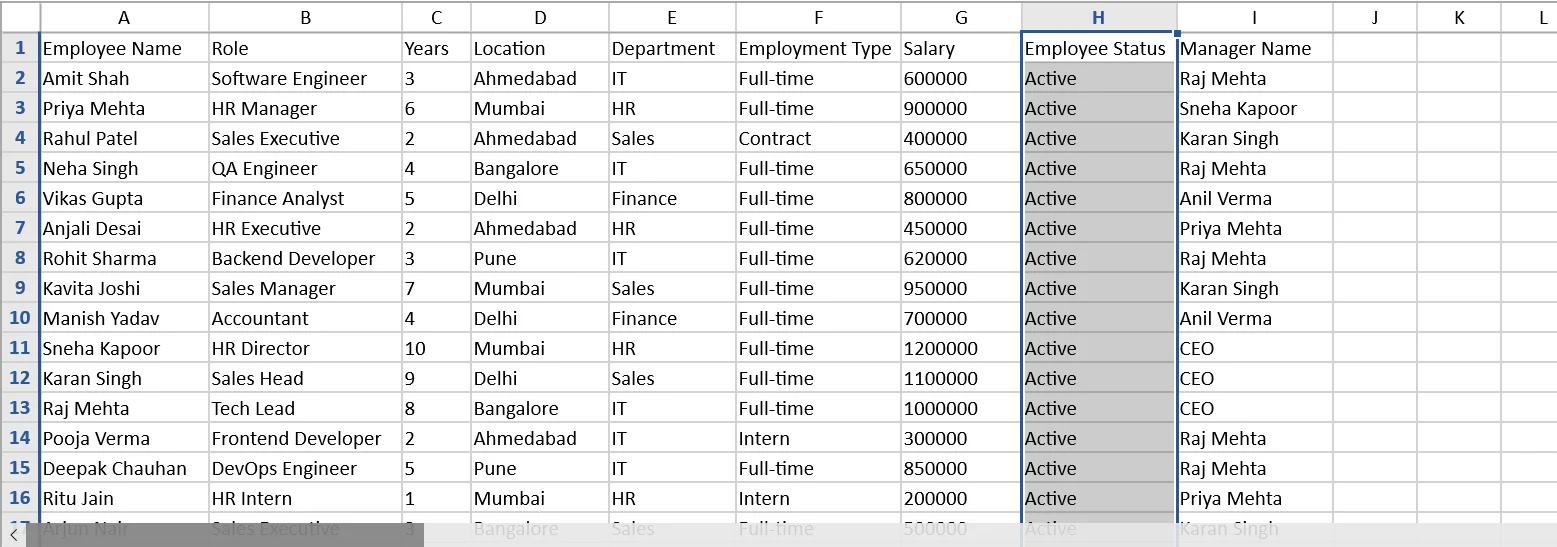
Before importing data, prepare a properly structured CSV file.
Example CSV structure :
| Employee Name | Role | Years | Location | Department | Employment Type | Salary | Employee Status | Manager Name |
|---|---|---|---|---|---|---|---|---|
| Rahul Patel | Sales Executive | 2 | Ahmedabad | Sales | Contract | 400000 | Active | Karan Singh |
Importing Data Using the Data Migration Center
Step 5 : Upload CSV File
- Select the CSV file
- Click Upload
Step 6 : Select Object Definition
Select the object definition where the data should be imported.
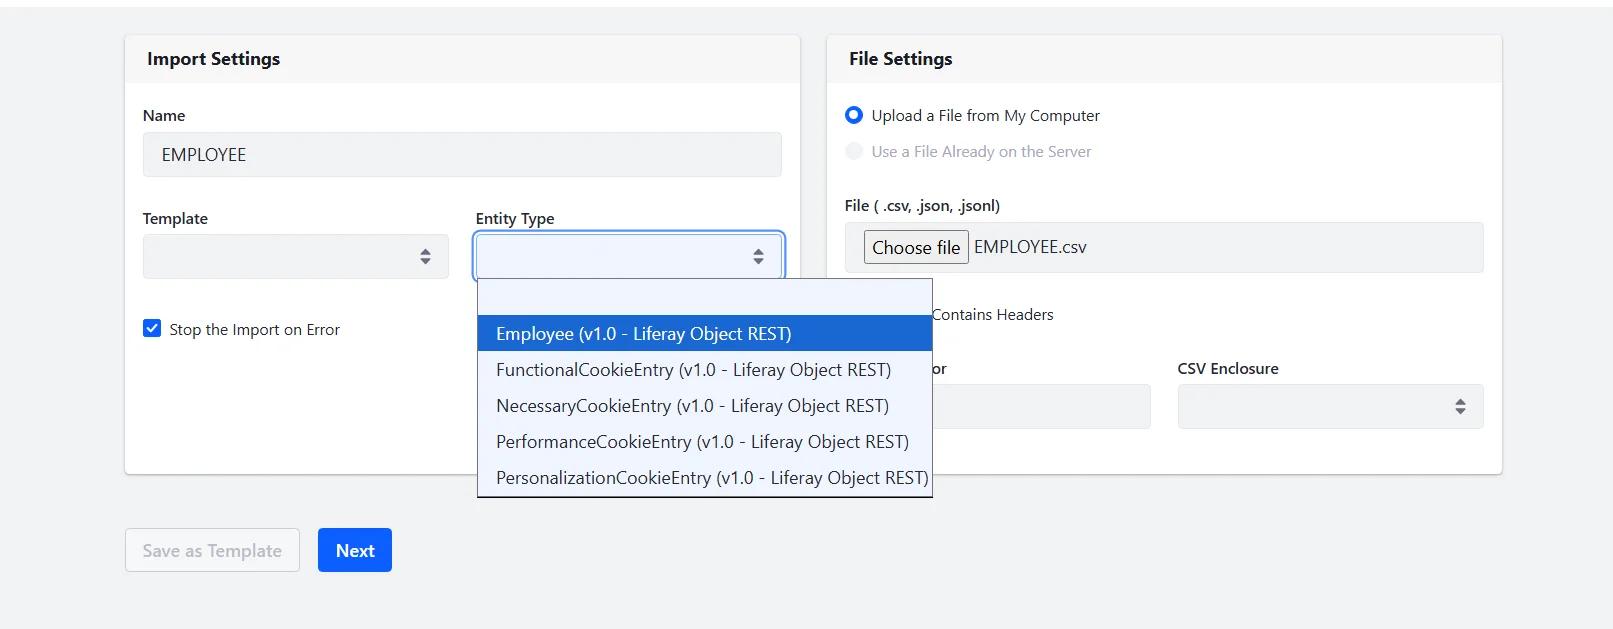
Example :
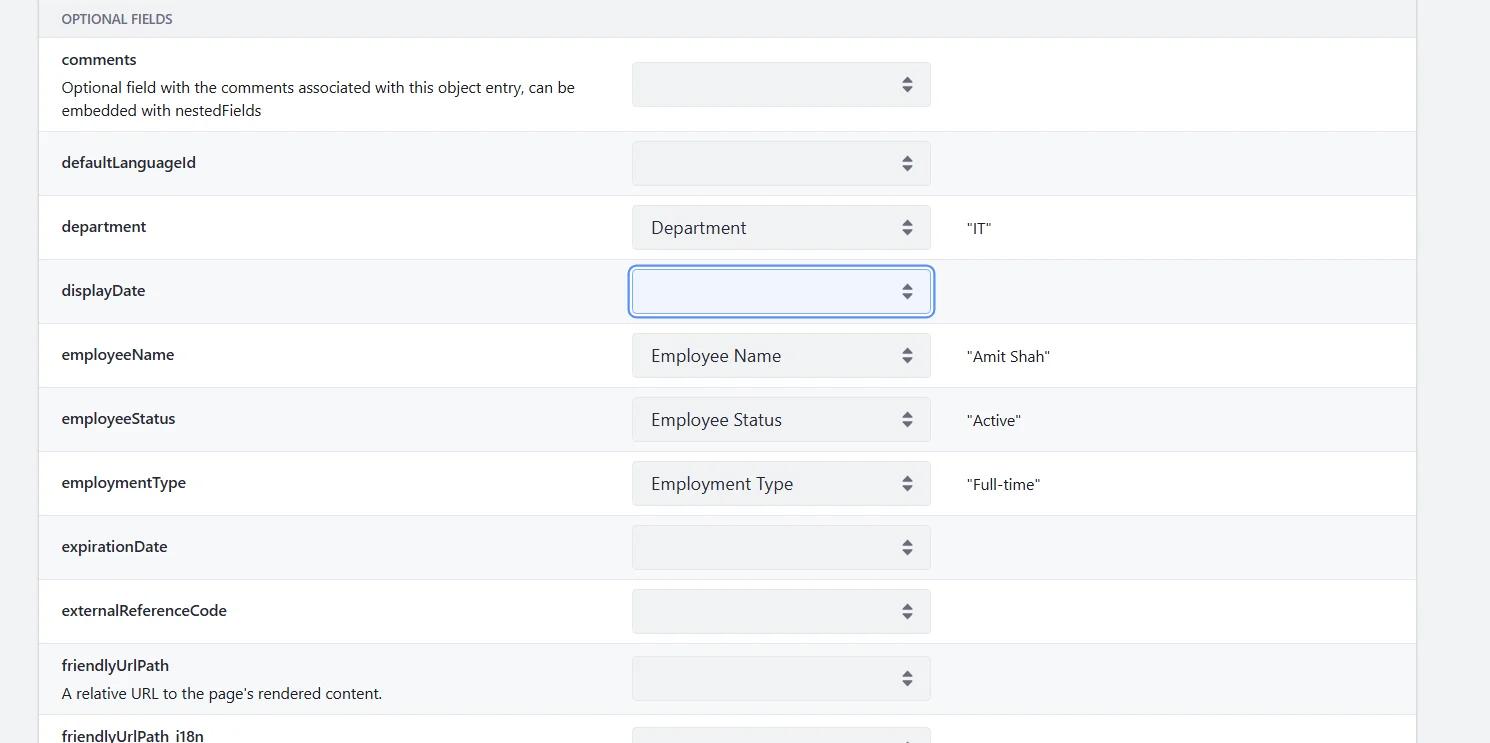
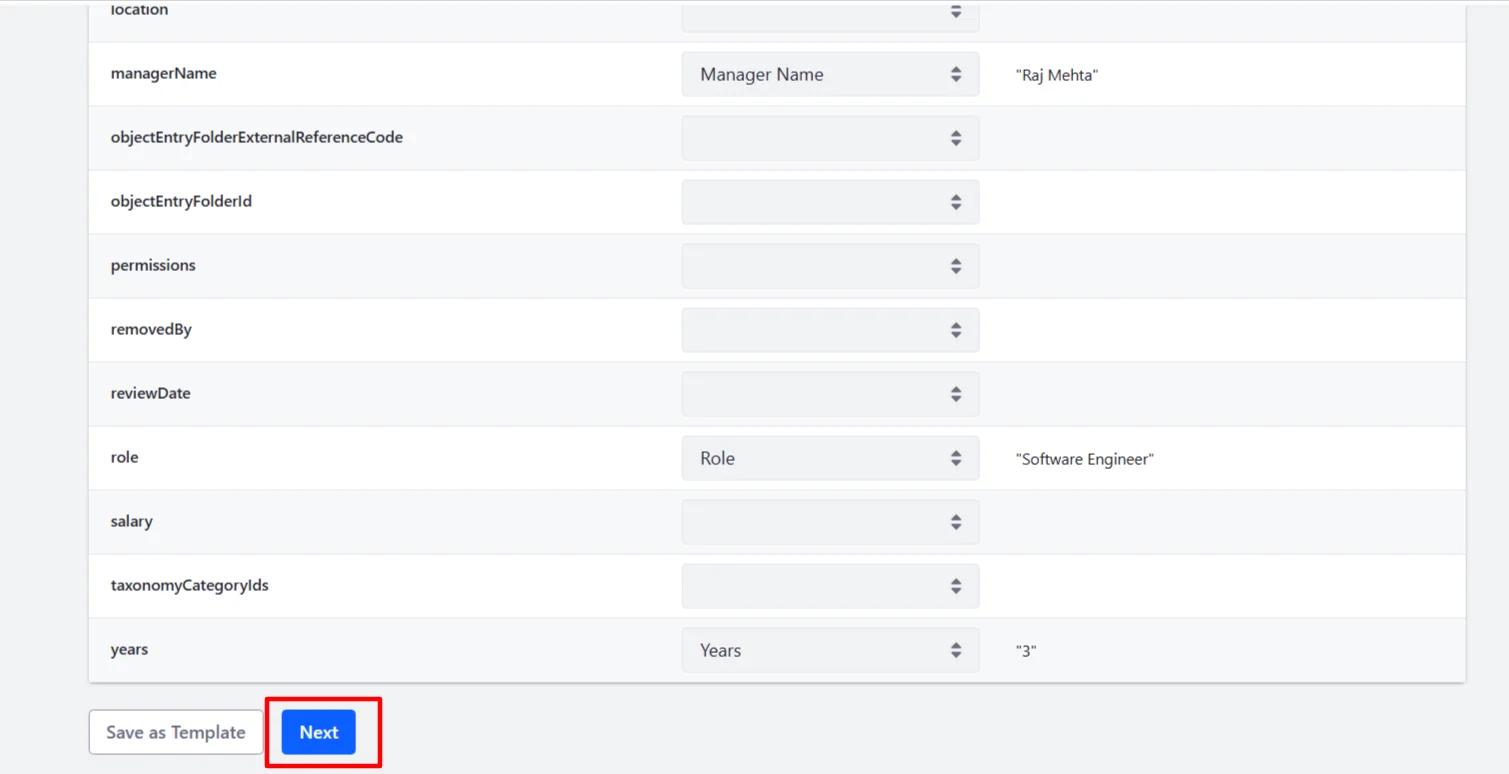
1Employee objectStep 7 : Map CSV Fields
Liferay automatically tries to map fields.
Example :
| CSV Column | Object Field |
|---|---|
| Employee Name | employeeName |
| Employee Status | employeeStatus |
| EmployeeType | employmentType |
| Department | department |
| Manager Name | managerName |
| Role | role |
| Years | year |
Verify all field mappings carefully before continuing.
Step 8 : Choose Import Strategy
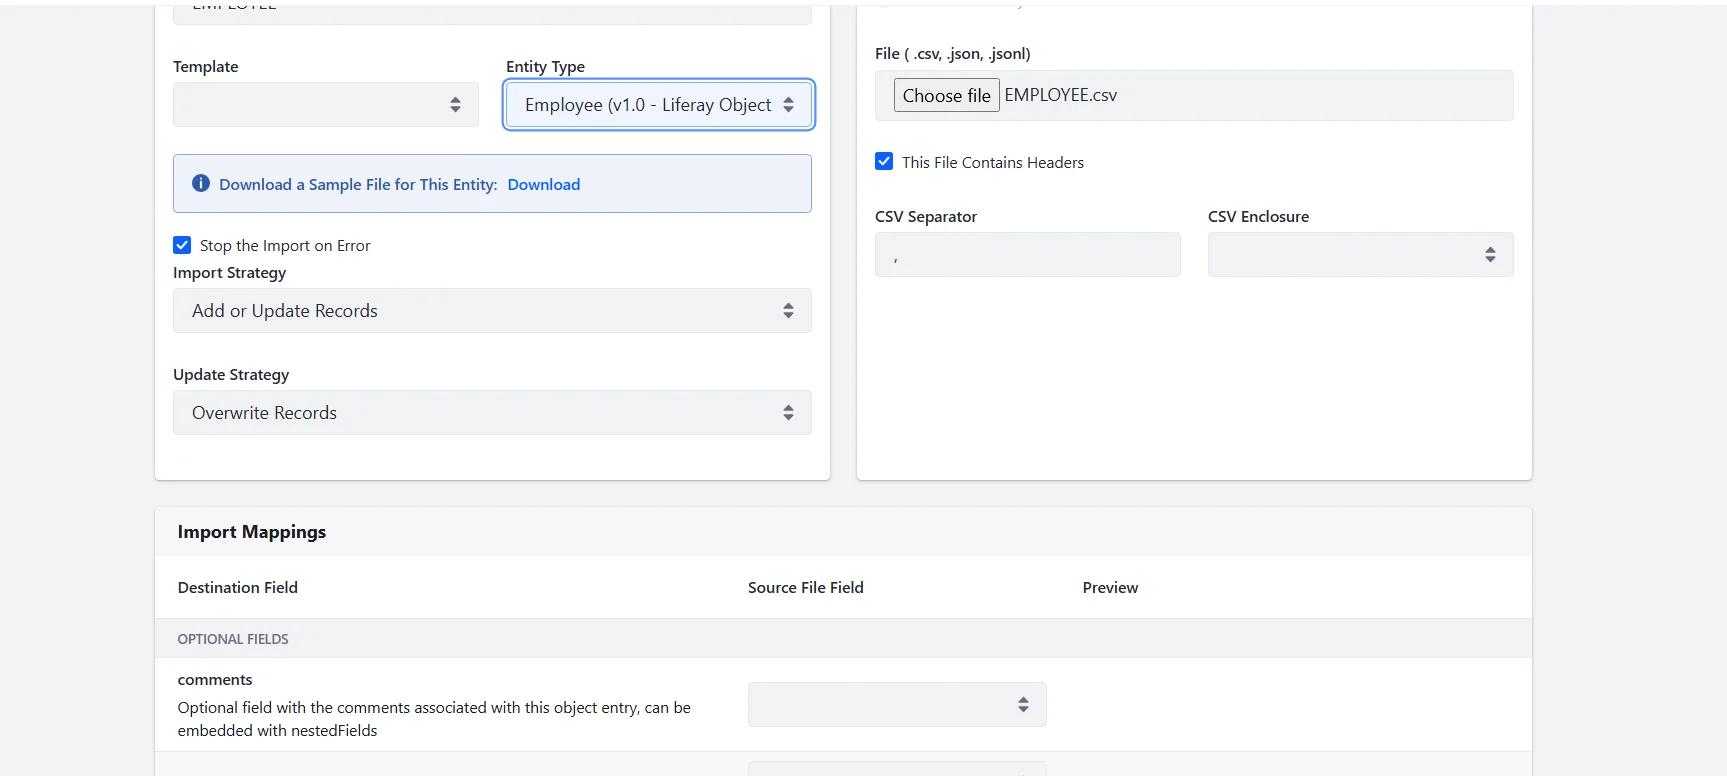
You will see options like :
- Insert Only
- Upsert (Add or Update)
This helps :
- Prevent duplicate records
- Update existing data automatically
Step 9 : Start Import
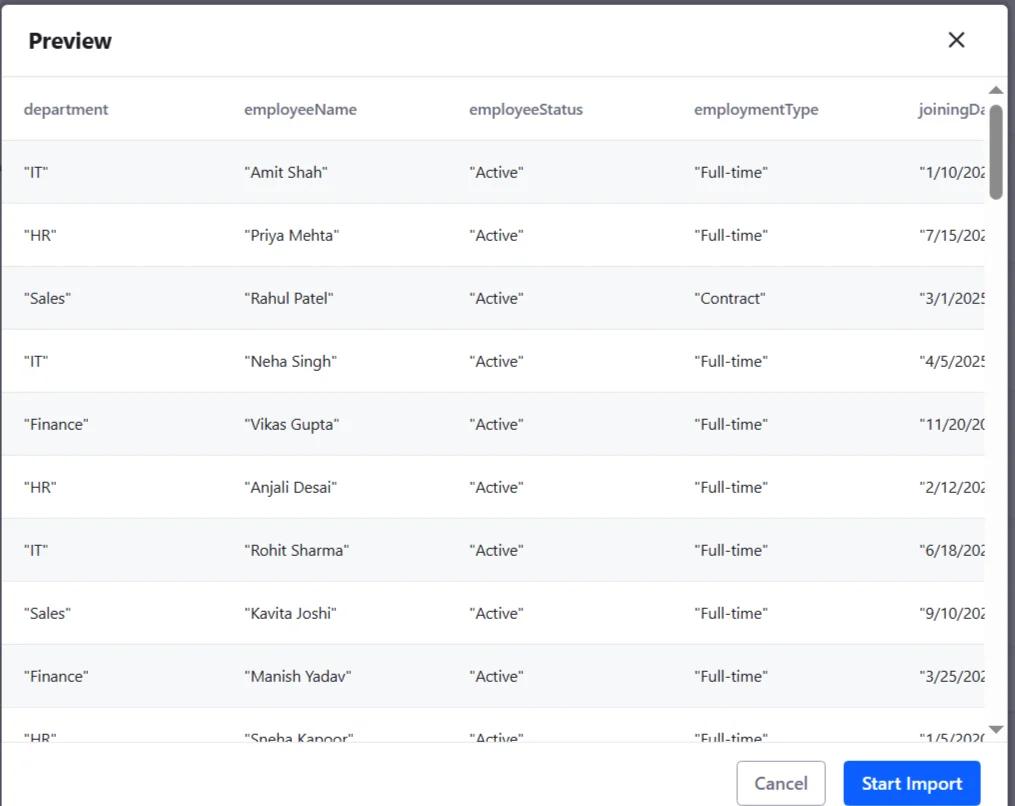
Liferay will begin processing the data.
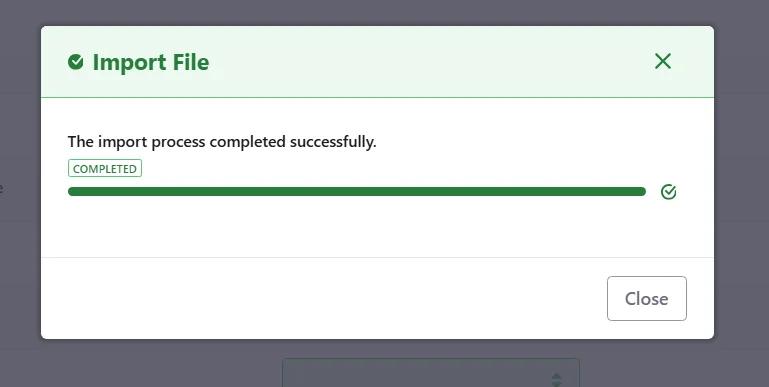
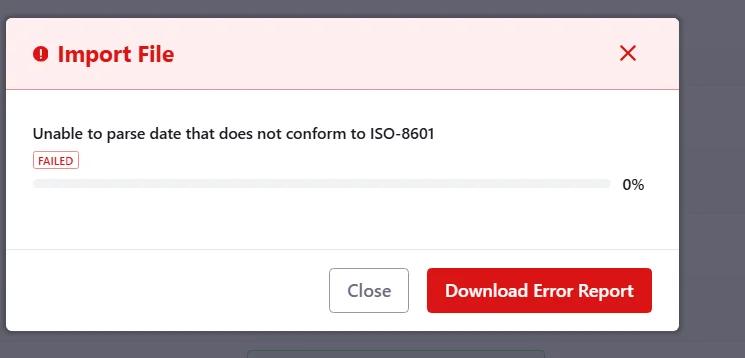
Step 10 : Verify Import Status
After completion :
- Check Success/Failed status
- Download the error report if needed
Output
After successful migration :
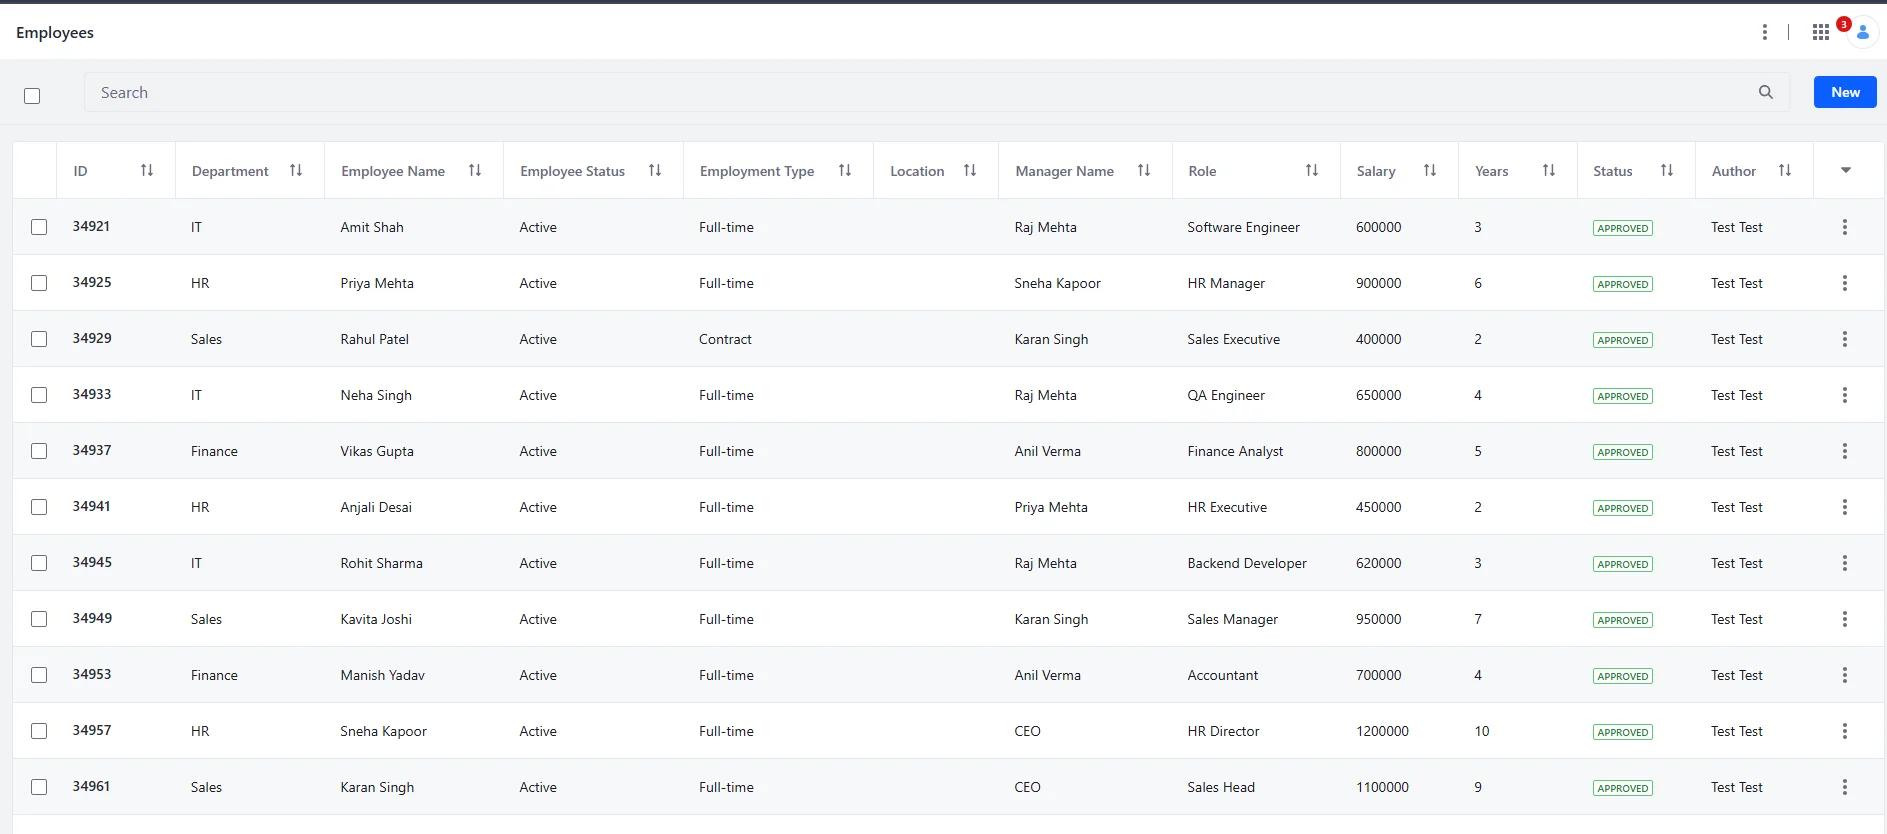
- The imported records will appear in the selected Object Definition.
- Data will be available inside the Liferay UI
- Existing records may be updated if Upsert is used
Advantages of Data Migration Center
- No coding required
- Easy bulk data migration
- Supports CSV and JSON formats
- Faster than manual data entry
- Reusable migration templates
- User-friendly interface
Disadvantages of Data Migration Center
- Still a Beta feature
- Strict CSV formatting required
- Limited complex transformation support
- Mapping issues may occur
- Large files may take more processing time
Conclusion
The Data Migration Center provides a simple way to handle data import and export operations in Liferay. Instead of manually creating records or writing separate migration scripts, users can upload structured files and manage data more efficiently.
Features such as CSV/JSON support, object mapping, and reusable configurations make the migration process easier, especially while working across development, testing, or production environments.
Since the feature is still in Beta, proper validation and testing are important before using it in production. However, for bulk object data migration, it can save significant time and reduce manual effort in day-to-day Liferay operations.