Configuration Creator in Liferay 7.2

Problem :
While working with the Liferay projects, you may need to create a configuration from the control panel like custom fields, structures, templates, roles, permissions, and many more in order to make portlet/implementation work properly.
Solution :
You can create the BundleActivator component to create the above configurations programmatically.
Benefits :
- We don’t need remember/prepare steps to create configurations from Control Panel.
- This will remove overhead of creating configurations in all environments (Dev, Test, Production) you have for your project.
Prerequisites
- Java
- Liferay portal 7/7.x
- Basic knowledge of Liferay
Environment Requirements
- JDK 8
- Eclipse
- MySQL
- Liferay Portal
- Gradle
To create BundleActivator for the Liferay project, you need to perform the below steps. In this example, we will explain to you to create custom fields, structure, templates and roles.
1) Create a Liferay module project using the following steps.
- Go to Liferay workspace project → modules → new
- Select other → Liferay → Liferay Module Project and Click on “Next”.
- Enter the project name.
- Select “Project Template Name” as “ MVC-portlet” and Click on “Next”.
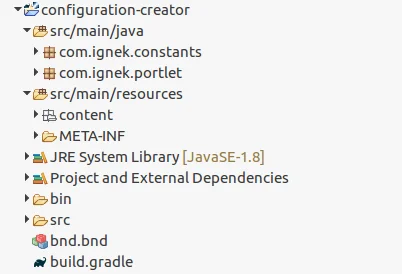
- Enter a Package name and click on “Finish”. The necessary file structure for the MVC-portlet automatically gets created as below.
2) Create a package with the name com.ignek.action.
3) Create one class with the name ConfigurationCreator into this package.
4) Enter the following line into the bnd.bnd.
1// bnd.bnd
2Bundle-Activator: com.ignek.action.ConfigurationCreator.
5) Enter the following lines into the build.gradle.
1// build.gradle
2compileOnly group: “org.osgi”, name: “org.osgi.core”
3compileOnly group: “com.liferay”, name: “com.liferay.dynamic.data.mapping.api”
4compileOnly group: “com.liferay”, name: “com.liferay.journal.api”
5compileOnly group: “com.liferay”, name: “com.liferay.petra.string”
6) Open ConfigurationCreator.java & add the following lines before the declaration of the class name.
1// ConfigurationCreator.java
2@Component(immediate = true,
3	property = {
4		"key=application.startup.events"
5	},
6	service = BundleActivator.class
7)
7) Implement the BundleActivator in ConfigurationCreator.
1// ConfigurationCreator.java
2public class ConfigurationCreator implements BundleActivator
8) Override the following methods inside the class ConfigurationCreator.
1// ConfigurationCreator.java
2@Override
3public void start(BundleContext context) throws Exception {
4}
5
6@Override
7public void stop(BundleContext context) throws Exception {
8}
Note : Start() method will call automatically when a module is deployed or Liferay server is started. We will add our code to create custom fields, structures, templates, and roles in this method.
1) Create custom fields
Write the below code in the start() method to create custom fields.
1//ConfigurationCreator.java
2/** Create custom fields **/
3/** Fetch default company in Liferay **/
4Company defaultCompany = CompanyLocalServiceUtil.getCompanyByMx(PropsUtil.get(PropsKeys.COMPANY_DEFAULT_WEB_ID));
5long companyId = defaultCompany.getCompanyId();
6/** Fetch Administrator role id **/
7long roleId = roleService.getRole(companyId, RoleConstants.ADMINISTRATOR).getRoleId();
8long userId = userLocalService.getRoleUsers(roleId, 0, 1).get(0).getUserId();
9try {
10	ExpandoBridge expandoBridge = ExpandoBridgeFactoryUtil.getExpandoBridge(companyId,
11		   Group.class.getName(),0 l);
12	if (Validator.isNotNull(expandoBridge)) {
13		int inputType = 15;
14		expandoBridge.addAttribute("Name", inputType, false);
15	}
16} catch (Exception e) {
17	log.error("Error occurred while creating custom field");
18}
xpandoBridge allows you to add custom fields in Liferay programmatically.
Notes :
1. You can choose different inputType for Custom fields.
| For Text and number | int inputType = 15; |
|---|---|
| For Selection | int inputType = 16; |
| For Map | int inputType = 21; |
| For Date | int inputType = 3; |
| For true/false (boolean) | int inputType = 1; |
2. You can choose different className to generate custom fields for sites, organizations, roles, users, and several more.
| For sites | Group.class.getName() |
|---|---|
| For Organization | Organization.class.getName() |
| For Role | Role.class.getName() |
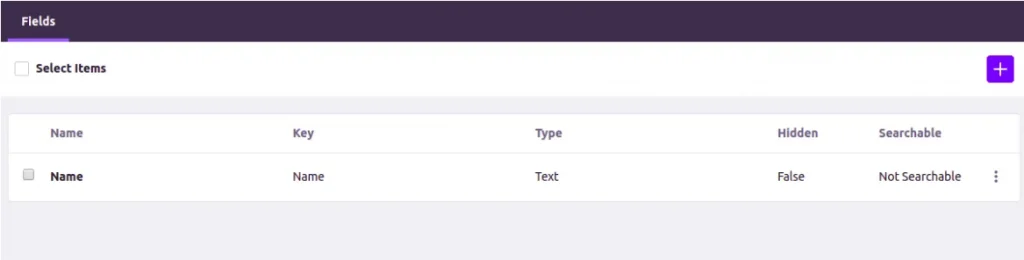
3. You can check generated custom fields from control-panel → configuration → custom-fields (refer below image).
1// ConfigurationCreator.java
2/** Create structure in global site **/
3long groupId = groupService.getCompanyGroup(companyId).getGroupId();
4String journalArticleClassName = JournalArticle.class.getName();
5long journalArticleClassNameId = classNameService.getClassNameId(journalArticleClassName);
6String structureKey = STUDENT;
7String content = getFile("structure/student.json");
8DDMForm ddmForm = DDMUtil.getDDMForm(content);
9ServiceContext serviceContext = new ServiceContext();
10serviceContext.setScopeGroupId(groupId);
11serviceContext.setCompanyId(companyId);
12serviceContext.setUserId(userId);
13DDMStructure studentStructure = null;
14try {
15	studentStructure = structureLocalService.getStructure(groupId,
16		journalArticleClassNameId, structureKey);
17} catch (NoSuchStructureException e) {
18	log.info("No Structure found Adding new one");
19}
20if (Validator.isNotNull(studentStructure)) {
21	try {
22		studentStructure.setDDMForm(ddmForm);
23		studentStructure = structureLocalService.updateStructure(userId,
24			studentStructure.getStructureId(),ddmForm,
25			DDMUtil.getDefaultDDMFormLayout(ddmForm), serviceContext);
26	} catch (Exception e) {
27		log.error("Error while updating structure");
28	}
29} else {
30	try {
31		Map<Locale, String> nameMap = new HashMap<Locale, String>();
32		nameMap.put(Locale.US, STUDENT);
33		Map<Locale, String> descriptionMap = new HashMap<Locale, String>();
34		descriptionMap.put(Locale.US, STUDENT);
35		studentStructure = structureLocalService.addStructure(userId, groupId, StringPool.BLANK,
36			journalArticleClassNameId, structureKey, nameMap, descriptionMap, ddmForm,
37			DDMUtil.getDefaultDDMFormLayout(ddmForm), StorageType.JSON.toString(),
38			DDMStructureConstants.TYPE_DEFAULT, serviceContext);
39	} catch (Exception e) {
40		log.error("Error while adding new structure");
41	}
42}
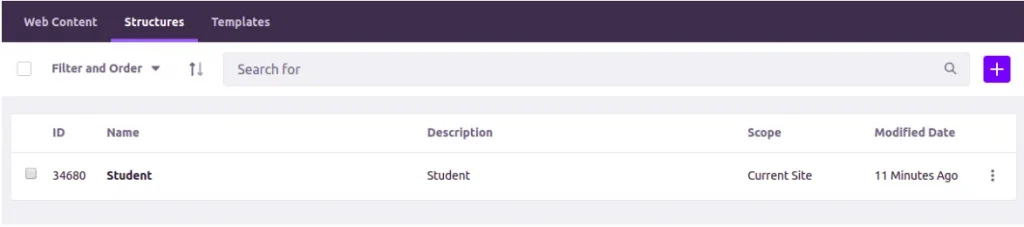
Output :
3) Create Template
To generate a template for an existing structure, perform below steps.
- Create one folder in src/main/resources with the name templates.
- Create one file with the name student.ftl in this folder.
- Add the source of the template into this file (You can copy the source from the Liferay admin panel).
- Add the following code into the start() method to create a template.
1// ConfigurationCreator.java
2/** Create template in global site **/
3String templateKey = STUDENT;
4String script = getFile("template/student.ftl");
5String structureClassName = DDMStructure.class.getName();
6long structureClassNameId = classNameService.getClassNameId(structureClassName);
7DDMTemplate studentTemplate = null;
8try {
9	studentTemplate = templateService.getTemplate(groupId, structureClassNameId, templateKey);
10} catch (Exception e) {
11	log.info("No template found Adding new one");
12}
13if (Validator.isNotNull(studentTemplate)) {
14	try {
15		studentTemplate.setScript(script);
16		studentTemplate = templateService.updateDDMTemplate(studentTemplate);
17	} catch (Exception e) {
18		log.error("Error while updating template");
19	}
20} else {
21	try {
22		Map < Locale, String > nameMap = new HashMap < Locale, String > ();
23		nameMap.put(Locale.US, STUDENT);
24		Map < Locale, String > descriptionMap = new HashMap < Locale, String > ();
25		descriptionMap.put(Locale.US, STUDENT);
26		studentTemplate = templateService.addTemplate(userId, groupId, structureClassNameId,
27			studentStructure.getStructureId(), journalArticleClassNameId,
28			templateKey, nameMap, descriptionMap,
29			DDMTemplateConstants.TEMPLATE_TYPE_DISPLAY, StringPool.BLANK,
30			"ftl", script, false, false, StringPool.BLANK, null, serviceContext);
31	} catch (Exception e) {
32		log.error("Error while adding a new template");
33	}
34}
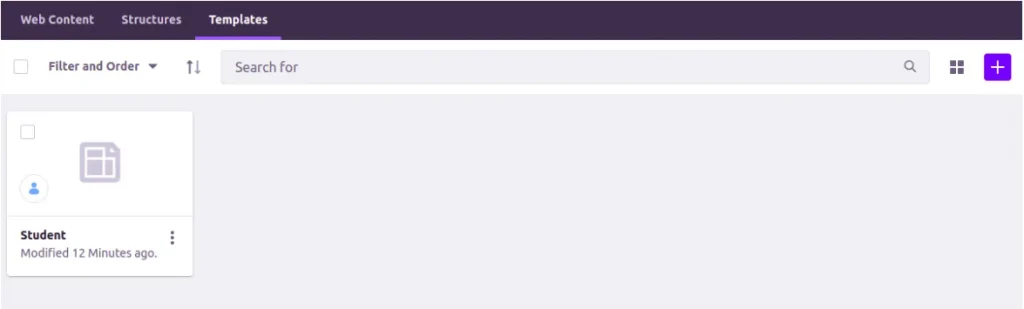
Output:
4) Create Roles
Write the below code (Inside the start() method) to generate roles in Liferay.
1// ConfigurationCreator.java
2/** Creating role **/
3try {
4	Role role = roleService.fetchRole(companyId, "Head of Organization");
5	Map < Locale, String > nameMap = new HashMap < > ();
6	nameMap.put(Locale.US, HEAD_OF_ORGANIZATION);
7	Map < Locale, String > descriptionMap = new HashMap < > ();
8	descriptionMap.put(Locale.US, "This role is for organization admin");
9	if (Validator.isNull(role)) {
10		role = roleService.addRole(userId, Role.class.getName(), 0, HEAD_OF_ORGANIZATION,
11			nameMap, descriptionMap, 1, null, serviceContext);
12	}
13} catch (Exception e) {
14	log.error("Error while adding role");
15}
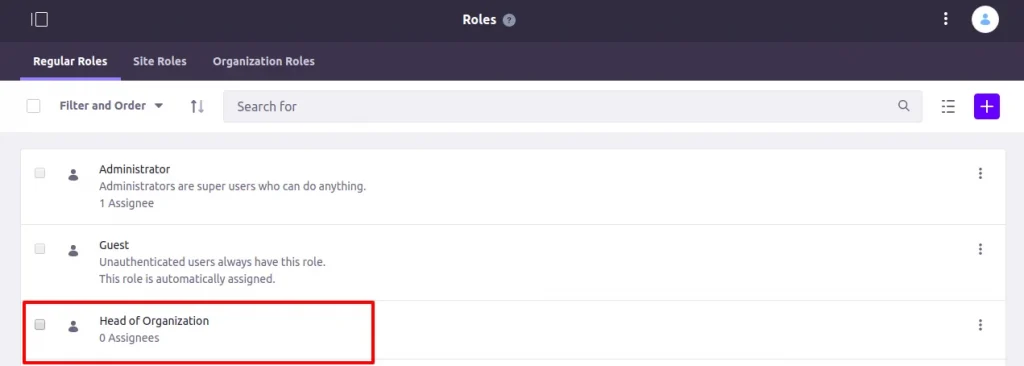
As you see, the Head of Organization role is created under control-panel → users → roles.
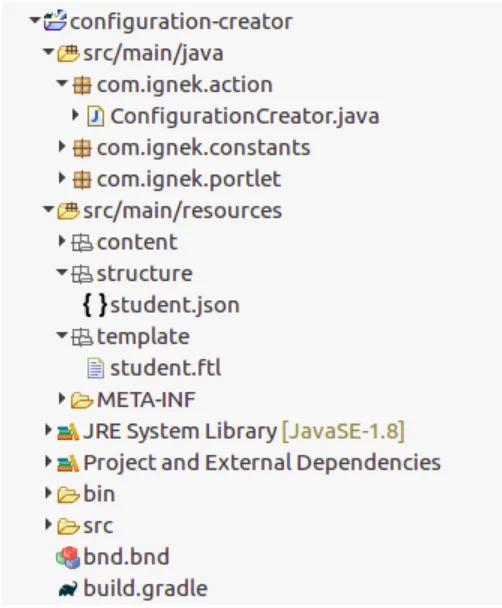
Now the structure of the Configuration Creator project will look like the structure below.
Now build/deploy this using the following command.
1blade gw deployYou can download the source code from the below link.


