Dockerized Microservices in springBoot

Introduction
Microservices architecture has become standard for building scalable, flexible, and maintainable applications. In microservices, each service is designed to operate independently, which allows for isolated scaling, easier debugging, and independent deployments.However, managing and deploying microservices can be complex and time-consuming. This is where Docker comes in.
Docker simplifies microservice architecture by providing lightweight, isolated containers to run each service. In this blog post, we will explore how to dockerize a microservices architecture using a dummy project for an online learning platform, which includes services like eureka-server (discovery service), api-gateway, user-service, course-service, and admin-service.
Why Docker
Docker is an open platform that can be used to deploy applications in secure containers. Docker containers are lightweight, simple to configure and work consistently in IT environments. Most Bitnami applications are available as Docker containers and offer all the usual Bitnami benefits: security, optimization, consistency and frequent updates.
Docker is a popular platform used for developing, shipping, and running applications. It enables developers to package their applications and their dependencies into standardized units called containers. These containers can then be easily moved between environments, such as development, testing, and production, ensuring consistency across different systems.
combining Microservices with Docker simplifies the deployment of applications, enhancing flexibility and efficiency in the software development lifecycle. This approach not only facilitates easier management but also ensures consistency and reliability across various deployment environments.
Prerequisites
- Docker : Docker is essential for containerizing microservices.
- Docker Compose : Docker Compose simplifies multi-container Docker applications.
- Java 17 : Our microservices are built using Spring Boot, which runs on Java 17.
- Maven : Maven is required for building Spring Boot projects.
- Spring Boot Development Environment (here IntelliJ IDEA).
Project Structure
1onlineLearningDemo/
2├── admin-service/
3├── api-gateway/
4├── course-service/
5├── discovery-service/
6├── user-service/
7├── docker-compose.yml
Each microservice has its own Spring Boot application and is containerized using Docker. The docker-compose.yml file helps orchestrate all the containers.
Setting Up Spring Boot Application
Create Microservices that you need for your application. I’m going to implement a dummy project for an online learning platform, which includes services like eureka-server (discovery service), api-gateway, user-service, course-service, and admin-service.
Step 1 : Writing the Dockerfile for Each Service
Each service needs its own Dockerfile to build the respective Docker image. Below is an example Dockerfile for the course-service:
1# Use a base image that has Java installed
2FROM openjdk:17-jdk-alpine
3
4# Set the working directory inside the container
5WORKDIR /app
6
7# Copy the Spring Boot jar to the container
8COPY target/course-service-1.0-SNAPSHOT.jar course-service.jar
9
10# Expose the port on which the service will run
11EXPOSE 8081
12
13# Define the command to run the jar
14ENTRYPOINT ["java", "-jar", "course-service.jar"]
Navigate to the project directory in the command prompt, and execute the following command to build the Docker image:
1docker build -t course-service .Repeat similar steps for the admin-service, api-gateway-service, course-service, and discovery-service.
Let’s break down this Dockerfile
- FROM openjdk : 17-jdk-alpine
This line specifies the base image for your Docker image. In this case, you’re using the openjdk:17-jdk-alpine image, which is an official Docker image that includes the OpenJDK 17 runtime on an Alpine Linux base. Alpine Linux is known for its small size, which makes the image more lightweight.
- WORKDIR /app
This line sets the working directory inside the Docker container to /app. Any subsequent commands (like COPY or RUN) will be executed in this directory. If the /app directory does not exist, it will be created. This is where your application files will be placed and run.
- COPY target/course-service-1.0-SNAPSHOT.jar course-service.jar
This line copies the course-service-1.0-SNAPSHOT.jar file from your local target directory (where it was built) into the /app directory inside the Docker container. The file is renamed to course-service.jar in the container. This is the executable JAR file of your Spring Boot application.
- EXPOSE 8081
This line informs Docker that the container will listen on port 8081. This is useful for documenting which port the application is expected to run on and is used when configuring Docker networking to allow connections to this port.
- ENTRYPOINT [“java”, “-jar”, “course-service.jar”]
This line defines the command that will be executed when the container starts. In this case, it runs the java -jar course-service.jar command, which starts your Spring Boot application. The ENTRYPOINT instruction sets the command and its arguments that will be used to run the container.
Step 2 : Defining the Docker Compose File
We need to define how all the services will interact within Docker. Below is the docker-compose.yml file, which contains all the services and the network configuration:
1services:
2  eureka-server:
3    build:
4      context: ./discovery-service
5      dockerfile: Dockerfile
6    container_name: discovery-server
7    ports:
8      - "8761:8761"
9    networks:
10      - microservices-network
11  user-service:
12    build:
13      context: ./user-service
14      dockerfile: Dockerfile
15    container_name: user-service
16    ports:
17      - "8083:8083"
18    networks:
19      - microservices-network
20    depends_on:
21      - eureka-server
22  course-service:
23    build:
24      context: ./course-service
25      dockerfile: Dockerfile
26    container_name: course-service
27    ports:
28      - "8081:8081"
29    networks:
30      - microservices-network
31    depends_on:
32      - eureka-server
33  admin-service:
34    build:
35      context: ./admin-service
36      dockerfile: Dockerfile
37    container_name: admin-service
38    ports:
39      - "8082:8082"
40    networks:
41      - microservices-network
42    depends_on:
43      - eureka-server
44  api-gateway:
45    build:
46      context: ./api-gateway
47      dockerfile: Dockerfile
48    container_name: api-gateway
49    ports:
50      - "8080:8080"
51    networks:
52      - microservices-network
53    depends_on:
54      - eureka-server
55  mysql:
56    image: mysql:8.0
57    container_name: mysql
58    environment:
59      MYSQL_ROOT_PASSWORD: password
60      # Create multiple schemas (databases) for each service
61      MYSQL_DATABASE: default_db
62      MYSQL_USER: user
63      MYSQL_PASSWORD: userpassword
64    ports:
65      - "3306:3306"
66    volumes:
67      - db-data:/var/lib/mysql
68      - ./init.sql:/docker-entrypoint-initdb.d/init.sql
69    networks:
70      - microservices-network
71    command: >
72      --default-authentication-plugin=mysql_native_password
73      --init-file=/docker-entrypoint-initdb.d/init.sql
74networks:
75  microservices-network:
76    driver: bridge
77volumes:
78  db-data:
Step 3 : Building and Running the Docker Containers
Once all the Dockerfile files are created, and the docker-compose.yml file is set up, you can build and start all the services using Docker Compose.
Run the following command to build and start the containers:
1docker-compose up --buildThis command will:
- Build Docker images for all services using their respective Dockerfile.
- Create containers for each service.
- Start all containers and expose the necessary ports as defined in the docker-compose.yml.
Step 4 : Verifying the Setup
Once the services are up and running, you can verify the setup by visiting the following URLs:
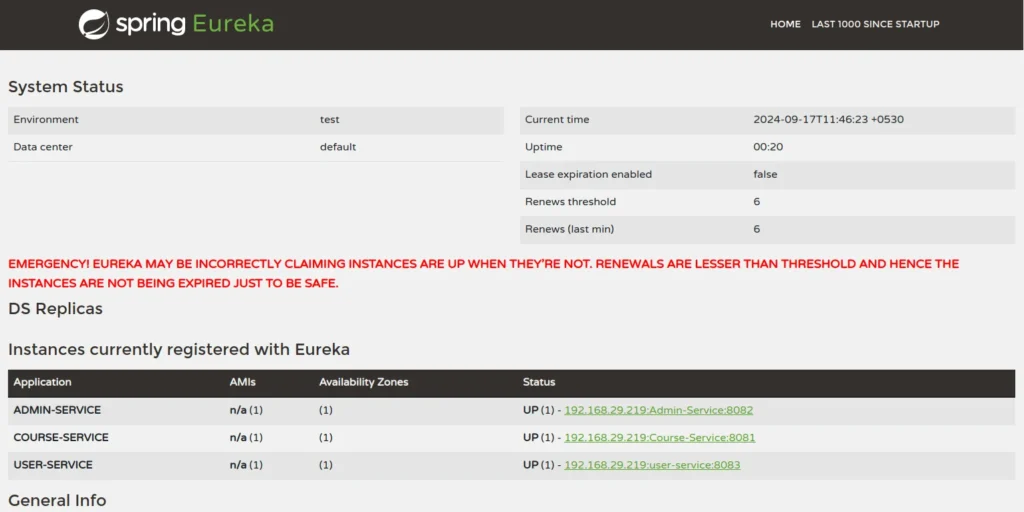
- Eureka Server : Open http://localhost:8761 in your browser to check if all services are registered.
- API Gateway : You can interact with your APIs via http://localhost:8080.
Conclusion
Dockerizing microservices offers a clean and scalable way to manage independent services. Using Docker and Docker Compose, we can containerize and orchestrate a microservices-based architecture efficiently. In this blog, we walked through the process of Dockerizing an online learning platform with multiple services, demonstrating how to create Docker images, manage containers, and ensure smooth communication between services.
By leveraging Docker, we make our applications more scalable, portable, and easier to deploy across different environments.


