Spring Boot
Custom Annotations in Spring Boot

Vikkey Barapate•Oct 17, 2023
Annotation
- Annotation represents the additional information of the program or provides the metadata of the program.
- We can add annotations on classes, methods, interfaces, packages, etc. After adding the annotation it cannot affect the source program.
- Two types of annotations:
- Inbuilt Annotations: Defined by the system itself.
- Custom Annotations: Defined by user or client.
Custom Annotation
- Custom Annotation means the user or client creates the annotations by themselves and uses them very effectively in the program.
Types of Custom Annotations
- Marker Annotation (Without declaring any method)
- Single-Valued Annotation (With single method)
- Multi-Valued Annotation (With multiple methods or more than one method)
1. Marker Annotation:
1public @interface class_name{
2
3}- This is the Marker Annotation. In Marker Annotation, there is nothing to declare any method.
2. Single Valued Annotation:
1public @interface class_name{
2	data_type method_name();
3}
3. Multi-Valued Annotation:
1public @interface class_name{
2	data_type method_name();
3	data_type method_name2();
4	data_type method_name3();
5	……
6	……
7}
Ways of Creating Custom Annotations
- There are three ways to create custom annotations:
- Class Level Annotation
- Field Level Annotation
- Method Level Annotation
1. Class Level Annotation:
- When we declare the Class-Level Annotation by using the @Interface annotation.
1public @interface class_name{
2
3}- The next step is to provide the @Target and the scope of the annotation which means adding the @Retention of the annotation.
1@Target(ElementType.TYPE)
2@Retention(RetentionPolicy.RUNTIME)
3public @interface class_name{
4
5}- @Target and @Retention annotations are called meta-annotation.
- Here, declare the @Target annotation indicates the custom annotation that can be used for annotating, and in this annotation, we declare various types of ElementType like,
| Element Type | Description |
|---|---|
| TYPE | You can use this ElementType on the class level, interface level, or on Enumeration. |
| FIELD | You can use this ElementType on the field level. |
| METHOD | You can use this ElementType on the method level. |
| CONSTRUCTOR | You can use this ElementType on the constructor level. |
| LOCAL_VARIABLE | You can use this ElementType on the local variable. |
| PACKAGE | You can use this ElementType on the package level. |
| ANNOTATION_TYPE | You can use this ElementType on the package level. |
| TYPE_PARAMETER | You can use this ElementType on the type parameter. |
| PARAMETER | You can use this ElementType on the formal parameter. |
- You can also declare multiple annotations in ElementType like,
1@Target({ElementType.TYPE, ElementType.METHOD})
2@Retention(RetentionPolicy.RUNTIME)
3public @interface class_name{
4
5}- Here, declare the @Retention annotation specifies the scope of the annotation and in this annotation, we declare various RetentionPolicy like
- RUNTIME: This Retention Policy indicates that the annotation is available at runtime or we can use our annotation on runtime.
- CLASS: It is a default Retention Policy in Java. This Retention Policy is used in the .class file and discarded on RUNTIME.
- SOURCE: This SOURCE Retention policy is also discarded at RUNTIME.
2. Field Level Annotation:
We are annotating the field by using the same syntax as in Elementype but changing the type FIELD.
1@Target(ElementType.FIELD)
2@Retention(RetentionPolicy.RUNTIME)
3public @interface class_name{
4	String key() default “ ”;
5}
3. Method Level Annotation:
We annotate the method. This method-level annotation initializes the object at the method level and indicates that this annotation identifies or marks it as a method by using @Target annotation.
1@Target(ElementType.METHOD)
2@Retention(RetentionPolicy.RUNTIME)
3public @interface class_name{
4}
There are some other annotations like, @Inherited and @Documented.
- @Inherited annotation is used when SubClass extends the SuperClass and SubClass uses the same annotation that SuperClass is used at that time @Inherited annotation is used.
- Example: There is “A” as a SuperClass and “B” as a SubClass. Now B used the same annotation that A can use.
1@MyAnno(Parameters)
2public class A{
3}1@MyAnno(Parameters)
2public class B{
3}1@Inherited
2public @interface MyAnno{
3}- We have to declare the @Inherited annotation when we are creating the Custom Annotation.
- @Documented annotation is meta-annotation. This tag will be used after when our software is ready. When we are declaring the custom annotation without using @Documented annotation the description of the annotation will not show on the Javadoc tool (On Java Document).
1//By without using @Documented annotation
2public @interface class_name{
3
4}1//With using @Documented annotation
2@Documented @interface class_name{
3
4}- After using the @Documented tag, we are showing all the descriptions with the tag which are showing on the Javadoc tool(On Java Document).
1//With using @Documented annotation
2@Documented
3@interface class_name{
4
5}
Example of Custom Annotation
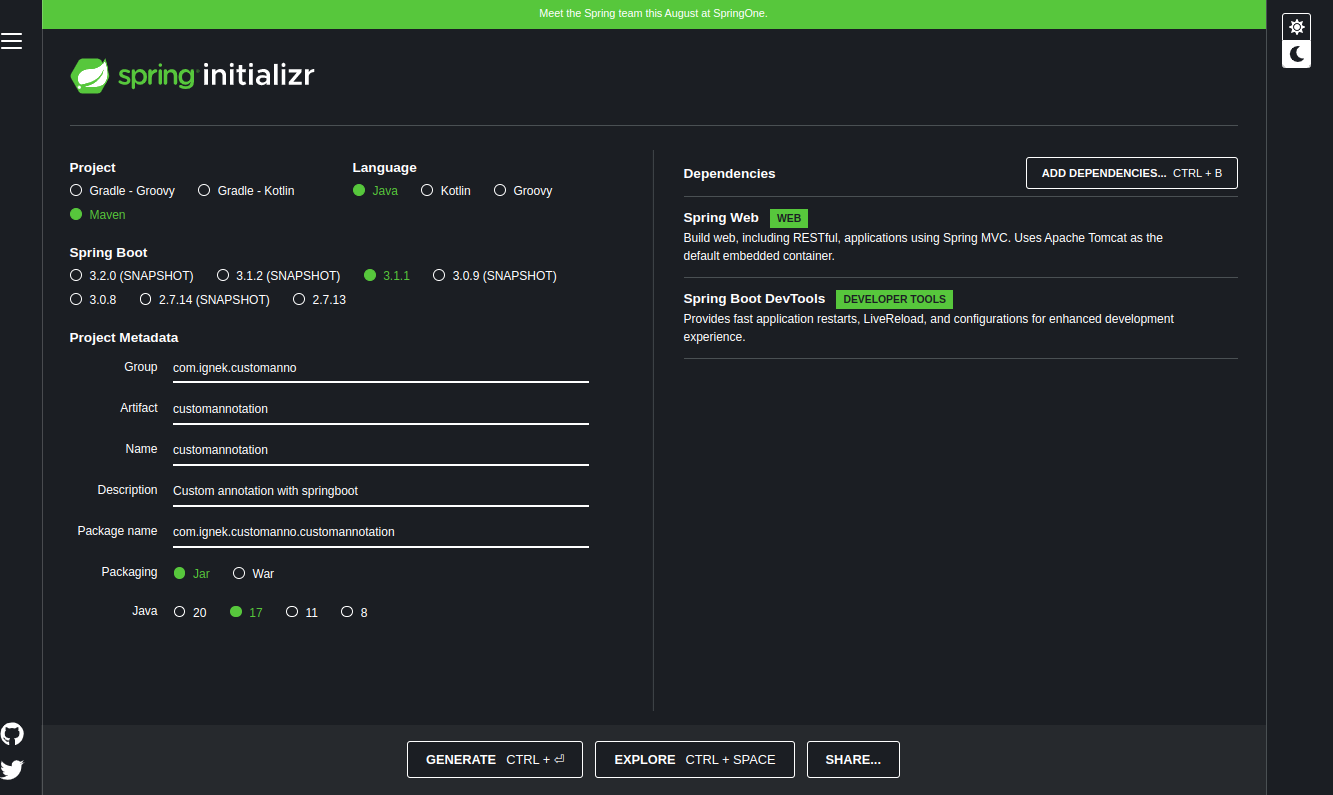
- Step 1: Create a Springboot project using Spring initializr.
- Step 2:Choose the Project field as Maven, language as Java, Springboot version, give the name to the project, and add dependencies like Spring Web and Springboot dev tools.
- Step 3: In the src/main/java directory, create an interface (here, SmartPhone). After creating the interface, declare ”@” before the interface i.e. “@interface”.
1//SmartPhone.java
2package com.ignek.customanno.customannotation;
3
4import java.lang.annotation.ElementType;
5import java.lang.annotation.Retention;
6import java.lang.annotation.RetentionPolicy;
7import java.lang.annotation.Target;
8
9@Target(ElementType.TYPE)
10@Retention(RetentionPolicy.RUNTIME)
11public @interface SmartPhone {
12	String os() default "Symbian";
13	int version() default 1;
14}- We declare EntityType as TYPE, so we can use this annotation at the class level, interface level, and enumeration.
- Here, RetentionPolicy is a RUNTIME annotation available at runtime.
- We declare two methods os() and version() and also declare the default value. If we do not declare any explicit value, the value returned by these methods will be considered as a default value.
- Step 4: In the src/main/java directory, create one class(here, NokiaSeries) and assign custom annotation @SmartPhone.
1// NokiaSeries.java
2package com.ignek.customanno.customannotation;
3
4@SmartPhone(os="Android", version=6)
5public class NokiaSeries {
6	String os;
7	int version;
8	public NokiaSeries(String os, int version) {
9		super();
10		this.os = os;
11		this.version = version;
12	}
13
14}- Assign custom annotation @SmartPhone and into the parentheses pass the parameter explicitly. If we do not assign a parameter to the parentheses, it is called the default value.
- Step 5: In the Main file.
1// CustomannotationApplication.java
2package com.ignek.customanno.customannotation;
3
4import java.lang.annotation.Annotation;
5import org.springframework.boot.SpringApplication;
6import org.springframework.boot.autoconfigure.SpringBootApplication;
7
8@SpringBootApplication
9public class CustomannotationApplication {
10
11	public static void main(String[] args) {
12		SpringApplication.run(CustomannotationApplication.class, args);
13
14		NokiaSeries ns = new NokiaSeries("Fire", 5);
15		Class c = ns.getClass();
16		Annotation an = c.getAnnotation(SmartPhone.class);
17		SmartPhone s = (SmartPhone) an;
18		System.out.println(s.os());
19		System.out.println(s.version());
20	}
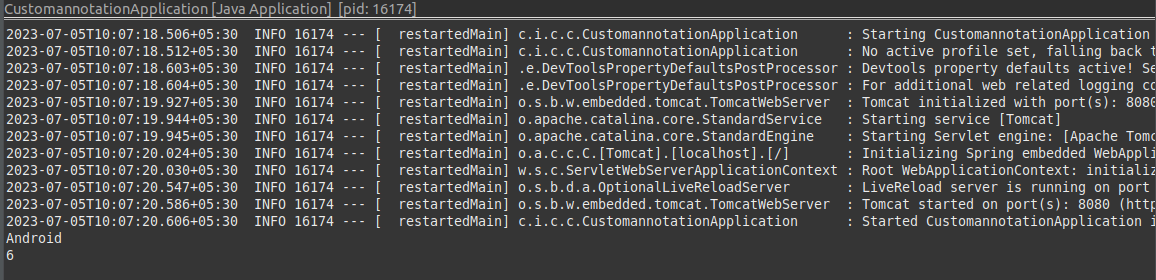
21}- We declare the object of the NokiaSeries class and pass the argument and test which values will be called.
- After creating the object of the NokiaSeries class, we get the class by using that class object and the getClass() method.
- And then get the custom annotation interface by using the getAnnotation() method.
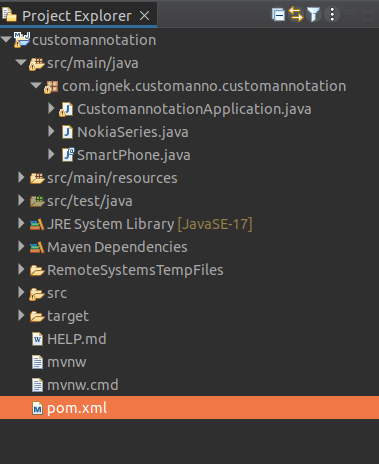
- Step 6: Create the project structure like this:
- Output: