Introduction
Mastering authorization and authentication in React.js is crucial for building secure, scalable, and user-friendly applications. This blog will guide you through the intricacies of authentication and authorization in React.js. From understanding the fundamentals to implementing advanced features, we will explore best practices and real-world scenarios to empower you in creating resilient and secure applications.
Prerequisites:
- Node.js and npm
- React
- Typescript
- React-Query
- Axios
Understanding Authentication and Authorization:
Before we dive into the details of authentication and authorization, let’s consider a few important aspects.
- Difference Between Authentication and Authorization:
Authentication and authorization are often used interchangeably, but they serve distinct purposes in the context of web security. Authentication verifies the identity of a user, ensuring that they are who they claim to be. This process involves validating credentials, commonly through a username and password. Authorization, on the other hand, is about determining what actions or resources a user can access after being authenticated. - Common Authentication Methods:
There are three common methods of user authentication:
- Username/Password Authentication: This is the traditional method where users enter a unique username and a secure password to access their accounts.
- Social Login: This method uses OAuth or OpenID Connect to authenticate users through social media accounts like Google, Facebook, etc. It provides a seamless and secure login experience.
- Token-based Authentication: This method authenticates users using tokens, such as JSON Web Tokens (JWTs). Upon successful login, tokens are issued and sent with each subsequent request to grant access.
- Differentiating between Client-side and Server-side Authentication:
Client-side authentication refers to authenticating users directly within the React.js application. This method may not be as secure, as sensitive information such as tokens may be exposed to potential threats. On the other hand, server-side authentication is handled on the server, and the client receives a session or token upon successful authentication. This approach is generally more secure as sensitive operations are carried out on the server.
- Authorized According to User Role:
Role-Based Access Control (RBAC) is an essential aspect of authorization in various applications. In React.js, users are given specific roles like admin, user, or moderator, and their access to resources or functionalities is granted based on these roles. The user interface can be dynamically adjusted based on the user’s role using conditional rendering in React components. This provides a personalized and secure experience for each user.
A Comprehensive Guide to Application:
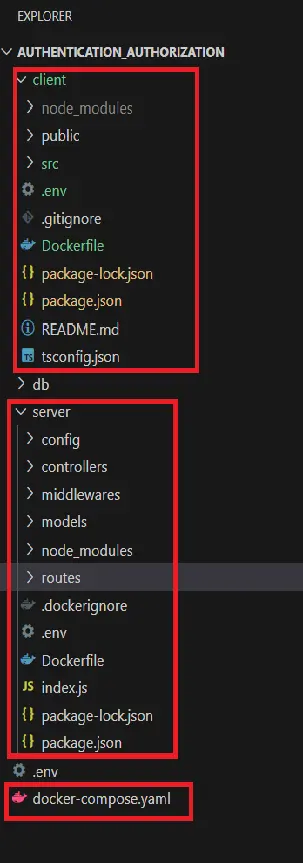
This application is an authentication and authorization app with a login, register, and role-based dashboard UI. It consists of a React.js frontend and Node.js backend server with Express for REST APIs and MySQL DB. We have already created a Dockerized Backend server in NodeJS and Connected it with the MySQL DB, we also utilized it and will create this React application also dockerized. The focus of this blog revolves around the process of Authentication and Authorization in React. For the complete Server and Database connecting implementation, refer to the following link: Docker Compose for Node.js and MySQL Integration.
To connect the React application to the same network and create a new docker container in docker-compose, you can use the Docker file for the Client folder.
# Use an official Node runtime as a parent image FROM node:latest # Set the working directory in the container WORKDIR /app # Copy package.json and package-lock.json to the container COPY package*.json ./ # Install app dependencies RUN npm install # Copy the React app files to the container COPY . . #Defining the port EXPOSE 3000 # Command to run the application CMD [“npm”, “start”] |
By following our guide, you can easily build a secure and efficient React application.

Navigating the Frontend Setup In React:
Let’s start the UI implementation for the Login and Register components and role-based dashboard navigation using React with a TypeScript template. We will also set up React-router-dom and React-Query.
Initializing React Application:
To create a React application, you need to start by creating a project folder in your root directory. Inside the project folder, create a client folder and install the necessary dependencies by running the following commands.
//Create react app using the following cmd
npx create-react-app client –template typescript
//Install the required dependencies
npm i react-router-dom axios react-query
- React-router-dom: It is an npm package that allows you to implement dynamic routing in a web app.
- Axios/ Axios-Interceptor: Axios/Axios-Interceptors provide a powerful way to intercept and modify HTTP requests and responses.
- React-Query: It offers an efficient way to handle server requests.
- Implementing User Registration and Login: Please follow the below steps to implement user registration and login in your project:
In the project client folder, locate the App.tsx file which serves as the entry point for the project.
- Use React-router-dom to create routes for login, register, user dashboard, and admin dashboard.
- Create a custom component for handling API requests. For optimal implementation, please refer to this link: Optimizing Network Requests in React with Axios Interceptors and React Query
- Create separate files for Register.tsx and Login.tsx and design the user interface according to your preference.
					// Imports
…
const Register = () => {
   …
  const [formData, setFormData] = useState<ApiParams>({
    fullName: "",
    username: "",
    email: "",
    phoneNumber: "",
    password: "",
    confirmPassword: "",
    role: "",
  });
  const handleChange = (e: React.ChangeEvent<HTMLInputElement>) => {
    const { name, value } = e.target;
    setFormData((prevData) => ({ ...prevData, [name]: value }));
  };

  const mutation = useApiMutation<ApiResponse, ApiParams>(
  //API mutation hook for registration
    "/auth/register",
    "post",
    {
      onSuccess: (data) => {
        alert(data?.msg);
      },
      onError: (error) => {
        console.error("Mutation error:", error);
      },
    }
  );

  const handleSubmit = (e: React.FormEvent<HTMLFormElement>) => {
  //Handle form submission
    e.preventDefault();
    if (formData.password !== formData.confirmPassword) {
      alert("Passwords do not match");
      return;
    }
    mutation.mutate({ data: formData });
    // Make the API call
  };
return (
    <div className="container">
      <div className="title">Registration</div>
      <form onSubmit={handleSubmit}>
        …
        …
        …
      </form>
    </div>
  );
};
export default Register;


… imports

const Login = () => {
…
  const [formData, setFormData] = useState<ApiParams>({
    email: "",
    password: "",
  });
  const navigate = useNavigate();
  const handleChange = (e: React.ChangeEvent<HTMLInputElement>) => {
    const { name, value } = e.target;
    setFormData((prevData) => ({ ...prevData, [name]: value }));
  };
  //API mutation hook for login
  const mutation = useApiMutation<ApiResponse, ApiParams>(
    "/auth/login",
    "post",
    {
      onSuccess: (data) => {
        alert(data?.msg);
        localStorage.setItem("token", data?.token); //set token in localstorage
         localStorage.setItem("role", data?.role);
        //role based navigation
        if (data?.role === "admin") {
          navigate("/admin/dashboard");
        } else {
          navigate("/user/dashboard");
        }
      },
      onError: (error) => {
        console.error("Mutation error:", error);
      },
    }
  );

  // Handle form submission
  const handleSubmit = (e: React.FormEvent<HTMLFormElement>) => {
    e.preventDefault();
       mutation.mutate({ data: formData });   // Make the API call
  };

  return (
    <div className="container">
      <div className="title">Login</div>
      <form onSubmit={handleSubmit}>
        …
      </form>
    </div>
  );
};

export default Login;
Let’s comprehend what we’ve written in the code.
- import the hooks and files from there path.
- Validate user input and form submission using the handleSubmit function
- Making API requests to the server for user authentication. To implement it we have initialized the API hook and here use the useApiMutation hook in both components.
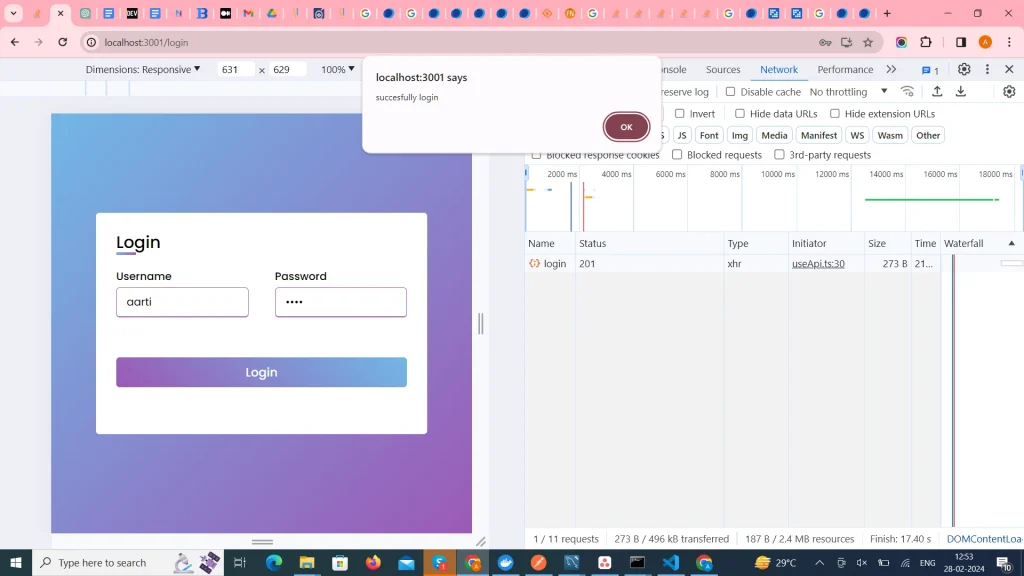
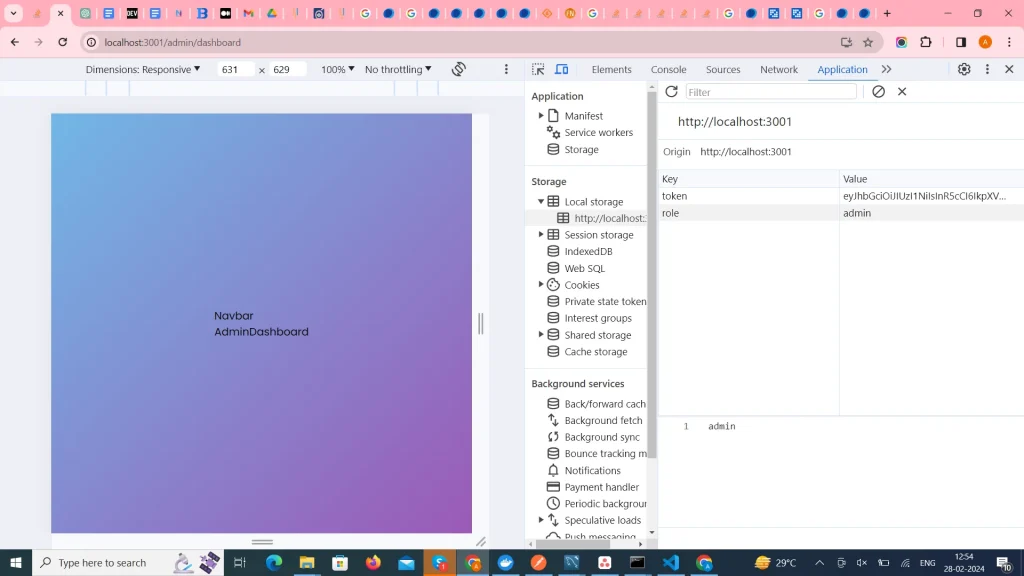
- At Login, we are setting the token and role in the local storage for further APIs authorization and navigation for the dashboard.
3. Securing Routes with Protected Routes:
To secure routes, we create a new utility file named ProtectedRoutes.tsx in the client folder. This file contains the implementation code that checks if a user is logged in or not by verifying the token stored in the local storage.
					…
const ProtectedRoute: React.FC<{ children: ReactNode }> = ({ children }) => {
  const { isAuthenticated } = useContext(AuthContext) as ContextAuth;
  const AllRoutes = useMemo(
    () => React.lazy(() => import("../routes/IndexRoute")),
    []
  );

  return (
    <Suspense fallback="...Loading">
      <AllRoutes>
        {isAuthenticated ? children : <Navigate to="/login" />}
      </AllRoutes>
    </Suspense>
  );
};

export default ProtectedRoute;
Let’s comprehend what we’ve written in the code.
- A context was created to globally check for token availability.
- The navbar is dynamically imported to show for authorized users otherwise redirect to login.
Configure this component in our route folder.
					function Routes() {
  return (
    <RouterRoutes>
   …
      {adminRoutes.map(({ path, component: Component }) => (
        <Route
          key={path}
          path={path}
          element={
            <ProtectedRoute> //checking protected route
              <Component />
            </ProtectedRoute>
          }
        />
      ))}
      {userRoutes.map(({ path, component: Component }) => (
        <Route
          key={path}
          path={path}
          element={
            <ProtectedRoute> //checking protected route
              <Component />
            </ProtectedRoute>
          }
        />
      ))}
      <Route path={"/"} element={<Navigate to="/login" />} />
    </RouterRoutes>
  );
}
export default Routes;
The main highlight is wrapping the user and admin route for the whole client application. When a component is passed as a child, it will check whether the user or admin route is authorized or not.
Lastly, after the user logs in, we check their role and redirect them to the appropriate routes based on their role.
Conclusion:
Wrapping up our journey, we’ve successfully crafted an Authentication and Authorization Application using React. To enhance its efficiency and deployment, we’ve containerized it using Docker-Compose. Additionally, we’ve implemented a user-friendly role-based navigation system, ensuring a seamless experience throughout the application. With these enhancements, our application is not just secure but also user-centric, making it a robust solution for authentication and authorization needs in your projects.
Output:


Unlock the potential of ReactJS with our Custom Application Development service. Tailored solutions for your unique needs. Expertise in building responsive, high-performance web apps. Let’s bring your vision to life with ReactJS. Check out our “Hire Us” services to get started.


