API headers demystified : a guide for React JS developers

Introduction:
Headers play a key role while working with APIs in React to ensure safe and sound communication between the client and server. Through the GET requests that are made to fetch data, or POST requests to send data, the headers are the key ingredient for building any application to get them working properly. This guide will walk you through the essentials of API headers and how to use them in your React projects.
Prerequisites:
- Node.js and npm
- React
- Typescript
- Axios or Fetch API
What Are API Headers?
API headers define the key-value pairs that are part of an HTTP request or response. They present more information about the request/response including the types of content, authentication tokens, caching rules, etc. It helps the server interpret the request and allows the client to process the respective outcome smoothly.
Understanding Basic HTTP Headers:
HTTP headers are key-value pairs sent between the client (browser or application) and the server as part of HTTP requests and responses. They provide essential metadata about the request or response, enabling the communication to work correctly.
- Authorization: It's used for authentication.
- Content-Type: It specifies the media type of the request body.
- Accept: It indicates the expected response format.
1fetch(API_URL, {
2   method: 'GET',
3   headers: {
4       'Authorization': 'Bearer your token here',
5       'Content-Type': 'application/json',
6        'Accept': 'application/json',
7   }
8});
Handling CORS with Headers:
CORS headers are specific configurations made on the server side and thus cannot be "fixed" through the React front-end or any client application but rather the API server should be properly configured to allow cross-origin requests.
- Access-Control-Allow-Origin: This indicates which origins (domains) are permitted to access the resources of the server.
- Access-Control-Allow-Methods: This specifies the various HTTP methods (e.g. GET, POST, and PUT) allowed for cross-origin requests.
- Access-Control-Allow-Headers: This indicates the specific headers that can be included in a cross-origin request.
1fetch(API_URL, {
2    method: 'POST',
3    headers: {
4        'Content-Type': 'application/json',
5        'Origin': 'https://yourdomain.com'
6    },
7    body: JSON.stringify({ key: 'value' })
8});
9
Security Headers:
Security headers improve the security of web applications from common vulnerabilities:
- X-Content-Type-Options: It disallows incorrect rendering of contents; and reduces chances of code execution attack.
- Content-Security-Policy (CSP): It limits the resources the browser can load and so reduces the attack surface for XSS.
- Strict-Transport-Security (HSTS): It makes all connections encrypted. Thus, the data of users will be protected in transit.
1fetch(API_URL,, {
2    method: 'GET',
3    headers: {
4        'X-Content-Type-Options': 'nosniff',
5        'Content-Security-Policy': "default-src 'self'"
6    }
7});
8
Optimizing Performance with Caching Headers:
Caching headers enhances the performance and responsiveness of web applications by refraining from requiring a new request to the server as much as possible and using previously fetched resources.
- Cache-Control: It specifies the rules concerning the caching of resources and the duration for which they are cached.
- ETag: It ensures that obsolete or old cached resources are refreshed in a very efficient manner without downloading any unnecessary data.
1fetch(API_URL, {
2    method: 'GET',
3    headers: {
4        'Cache-Control': 'no-cache',
5        'If-None-Match': 'your-etag-here'
6    }
7})
8
Using Custom Headers:
It is used for specific client-server communication needs.
1fetch(API_URL, {
2    method: 'GET',
3    headers: {
4        'Cache-Control': 'no-cache',
5        'If-None-Match': 'your-etag-here'
6    }
7});
8
Frontend Setup in React:
We’ll write the code to get a better understanding of API headers.
Step-by-step Implementation
- Create a React App:
- Let’s create a React app using the following command:
1//Create a react app using the following command
2
3npx create-react-app api-header-app --template typescript
4
5
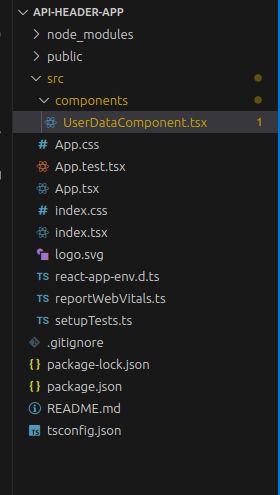
6- Project Structure:
- Make sure your project has the following folder structure:
- API Header Example:
- Here we are fetching the user data using the native Fetch API.
1// UserDataComponent.tsx
2import { useEffect, useState } from "react";
3
4type User = {
5  id: number;
6  username: string;
7  email: string;
8};
9
10function UserDataComponent() {
11  const [userData, setUserData] = useState<User[]>([]);
12
13  const getUserData = async() => {
14      try {
15        // Put your API URL here
16        const API_URL = 'https://mocki.io/v1/13ee38ec-2768-48f1-ad4b-63ea27ea66f4';
17        const response = await fetch(API_URL, {
18          method: 'GET',
19          headers: {
20
21            // Content-Type header to specify the format of the request
22            'Content-Type': 'application/json',
23
24            // Caching headers to optimize performance
25            'Cache-Control': 'no-cache',
26            'If-None-Match': 'your-etag-here',
27          },
28        });
29
30        // Check if the response is OK (status 200) or if the resource is unchanged (status 304)
31        if (response.ok) {
32          const data = await response.json();
33          setUserData(data.usernames);// set the user data
34          console.log('Data fetched successfully:', data);
35        } else if (response.status === 304) {
36          console.log('No changes in data, using cached version.');
37        } else {
38          console.error('Error fetching data:', response.status, response.statusText);
39        }
40      } catch (error) {
41        console.error('Unexpected error:', error);
42      }
43  };
44
45  useEffect(() => {
46    getUserData();
47  }, []);
48
49  return (
50      <ul className="user-form-container">
51      {userData.map((user) => (
52        <li key={user.id}>
53          <strong>{user.username}</strong>
54        </li>
55      ))}
56      </ul>
57  );
58}
59export default UserDataComponent;
Here is a detailed explanation of the code:
- Headers:
- Authorization: Used for authentication (replace your token here with the actual token).
- Content-Type: Tell the server that the request body is a JSON one.
- Cache-Control and If-None-Match: Used for caching and resource validation.
- Response Handling:
- response.ok: Checks if the status is between 200-299, indicating success.
- response.status === 304: this thing hasn't changed since the last time you fetched it.
- Error Handling:
- try...catch is what you need to handle network errors or any other kind of unexpected issue.
- If any error occurs, that error is logged on the console.
- Integrating the Components into the App:
- Now we will import the UserDataComponent into the main App.tsx file. This will create the UI renderer for that component.
1//App.tsx
2import UserDataComponent from "./components/UserDataComponent";
3import "./App.css";
4
5function App() {
6  return (
7    <div className="App">
8      <UserDataComponent />
9    </div>
10  );
11}
12
13export default App;
14
Debugging Header Issues:
Headers can sometimes be tricky to debug. Here are some tips:
- Browser Developer Tools: Make use of the "Network" tab of your browser's developer tools for inspection when it comes to request and response heads.
- Console Logs: Log your headers pre-request to make sure they're hooked up.
- API Documentation: Verify header requirements against the API’s documentation.
Security Considerations:
When addressing the required headers, sensitive data items must be secured:
- Environment Variables: Components such as API keys should be stored in environment variables rather than hard-coded.
- HTTPS: Always be sure to use HTTPS to encrypt requests.
- Token Expiry: Refresh tokens once they have expired to prevent authentication errors.
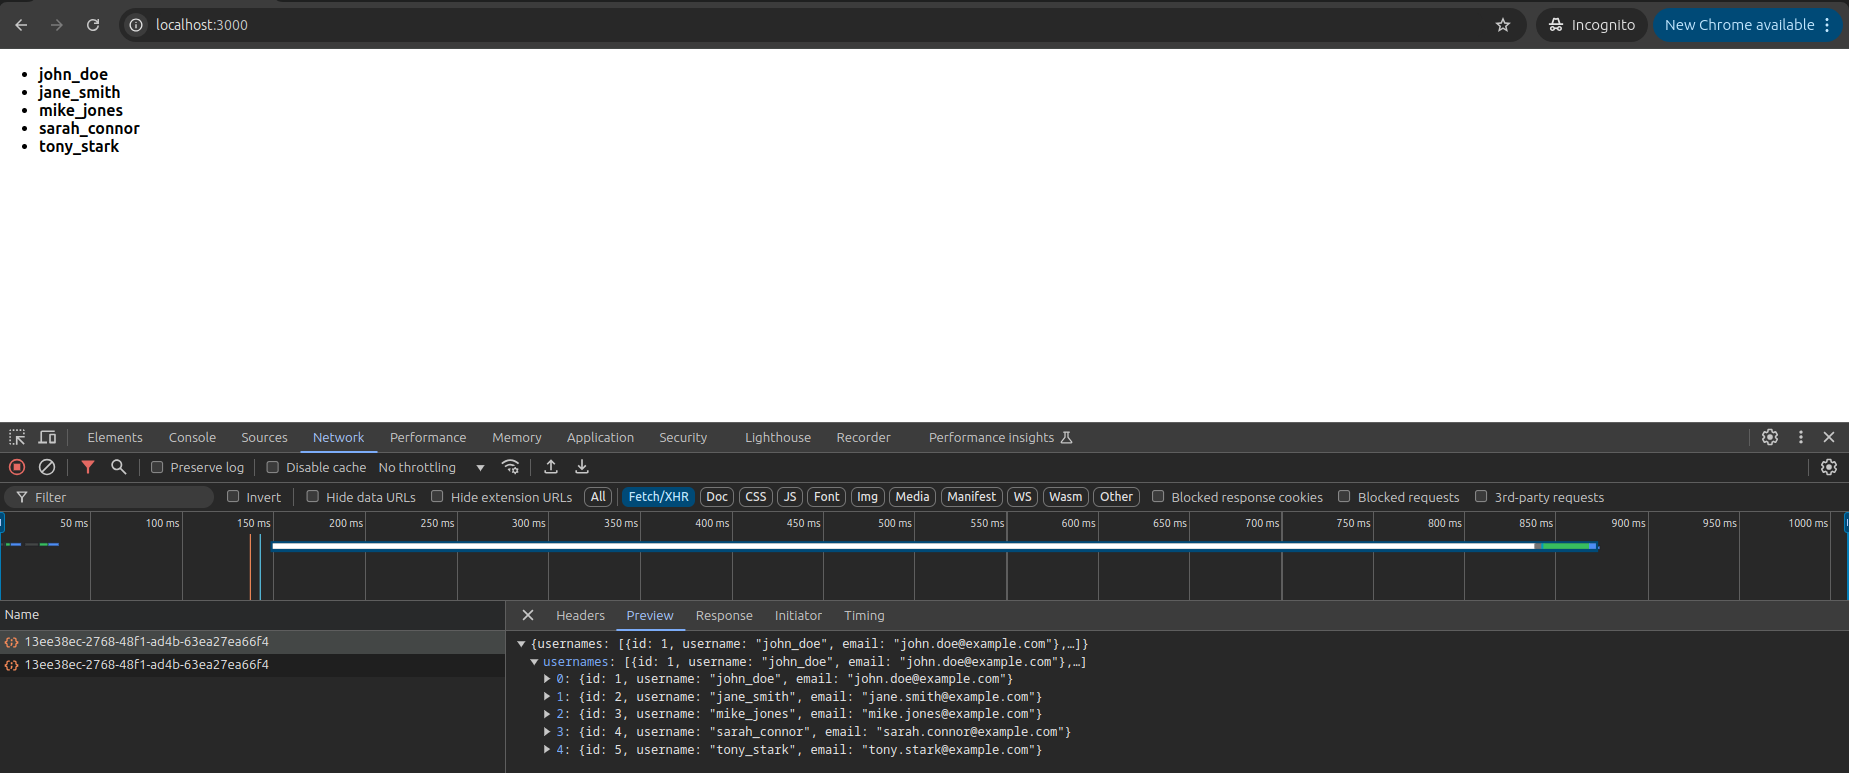
Output:
Conclusion:
Understanding API headers and their proper usage is fundamental for React developers. They ensure safe and effective client-server communication. Whether we are fetching data or submitting forms, headers provide the context your application needs to work seamlessly with APIs.
By learning headers and how to use them within libraries like Axios or the fetch API, we’d be able to master much more intricate manipulation of APIs in your React projects.


