Persisting React State in LocalStorage

Introduction:
In today's web applications, providing a seamless experience across sessions is crucial for keeping users engaged. Imagine filling out a form, navigating away, and returning to find all your progress saved—this is the magic of state persistence! One popular and simple way to achieve this is through the localStorage Web API.
In this blog, we’ll explain how to save and restore the React state using local storage in a React TypeScript Application. We’ll cover practical examples, explore when this approach is most useful, and compare it to other storage options like session storage and cookies.
Prerequisites:
- Node.js and npm
- React
- Typescript
- JSON.parse() and JSON.stringify()
What is the LocalStorage?
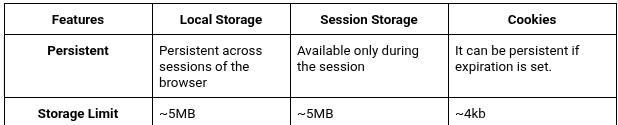
Local storage is web storage that allows data to be stored as key-value pairs and retrieved in the browser. It's a straightforward, synchronous API; all the data saved are strings, and the data also survives closing the browser, making it great for expiring data storage across sessions.
Common Use Cases:
Here are some scenarios where persisting state using local storage is beneficial:
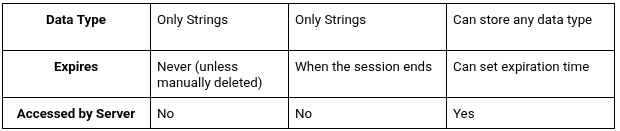
- Theme Persistence: Keep User preferences about light/dark themes applied for sessions.
- Shopping Cart Data: Add the elements inserted in the cart so that the users view what they selected at a later date.
- Form Data: Store partially completed forms so that users can complete them later without losing progress.
- Authentication Tokens: Store JWT tokens or session information.
Key features:
- Persistent Data: The information you save in local storage will remain while the browser is open and even after it closes and reopens again. It will only be deleted if the user clears their storage or your code does it.
- Storage Limit: Each domain has about 5MB of storage. However, this varies slightly from browser to browser.
- Stores Only Strings: localStorage only accepts data in the form of strings. To save objects or arrays, data should be changed to strings using JSON.stringify(), after which on retrieval, it needs to be parsed with JSON.parse().
- Synchronous API: LocalStorage is blocked from using the main thread since all interactions with it are synchronous. In small operations, this won't be noticeable; however, for big datasets or heavy reads/writes, this has its impact on performance.
Methods:
- setItem(): This method allows the user to store data in the form of a key-value pair in local storage. The two parameters it takes are key and value.
Syntax: localStorage.setItem(key,value)
- getItem(): This method allows the user to retrieve the data using the key from local storage. It accepts only one parameter, the key, and returns the value as a string.
Syntax: localStorage.getItem(key)
- removeItem(): This method allows the user to remove particular data with its key from the local storage. When you pass the key name to the removeItem() method, it removes the item associated with that key from localStorage. If there's not any item associated with that key, this method will do nothing.
Syntax: localStorage.removeItem(key)
- clear(): This method will allow the user to clear all the saved data that persist in localStorage.
Syntax: localStorage.clear()
- key(): This method is used for the key at a specific index.
Syntax: localStorage.key(index)
- length(): This method gives a number of items stored in the localStorage.
Syntax: localStorage.length()
Frontend Setup in React:
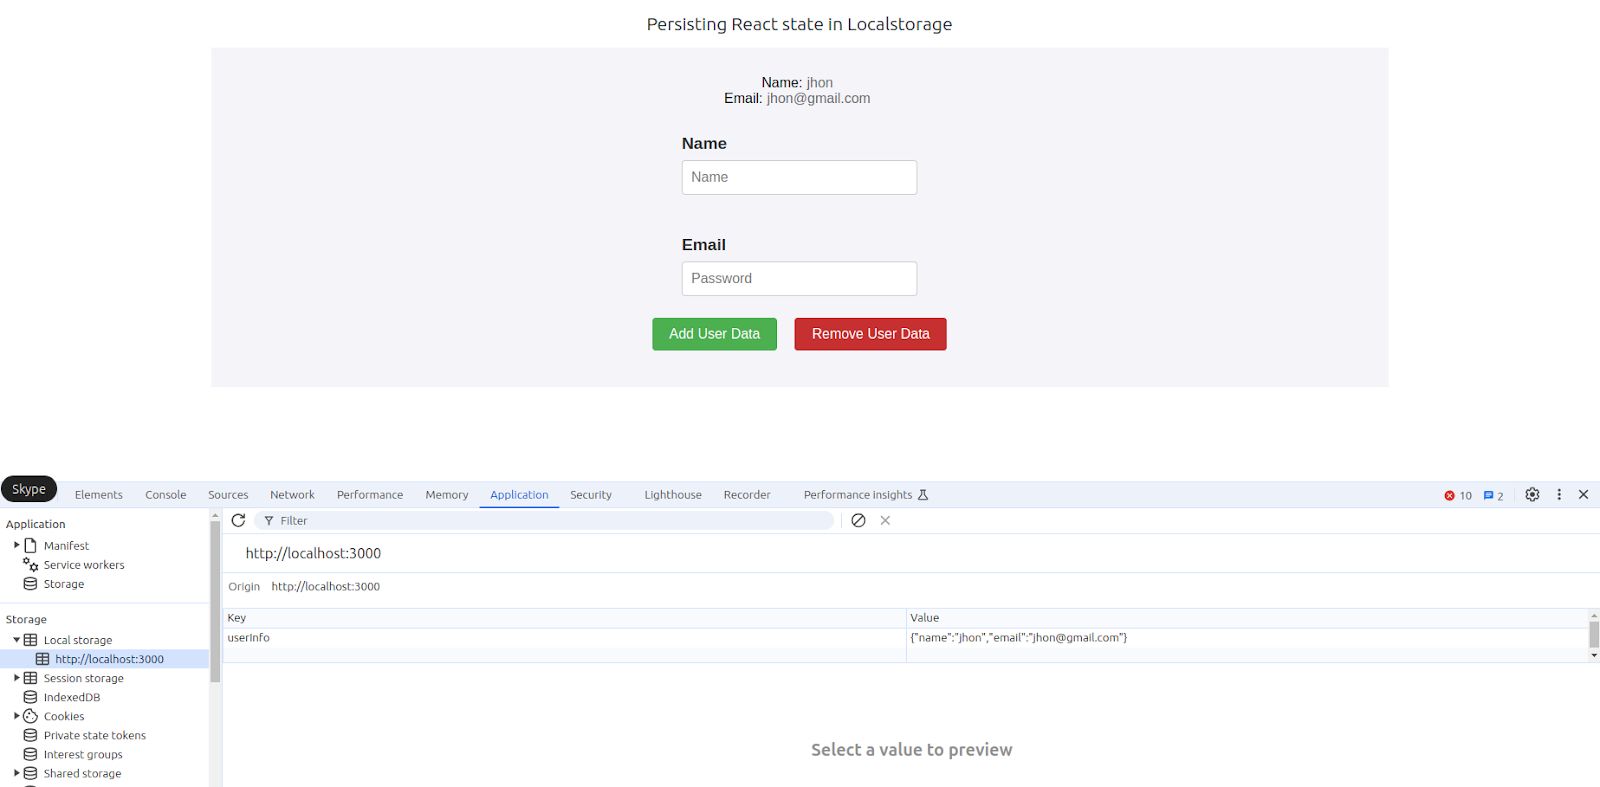
We’ll create a user form in React that allows users to enter their name and email. The form data will be saved to localStorage to ensure the information persists even after a page refresh or browser restart.
Step-by-step Implementation
- Create a React App:
Let’s create a React app using the following command:
1//Create a react app using the following command
2
3npx create-react-app local-storage-app --template typescript
After the setup is complete, navigate to your project folder:
1// Navigate to  project folder
2 cd local-storage-app
3 npm start
This will launch the development server, and you’ll be able to view the app at http://localhost:3000.
2. Project Structure:
Make sure your project has the following folder structure:
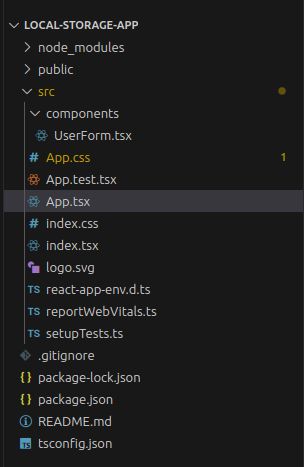
3. Create the UserForm Component:
We’ll create a separate UserForm component inside the components folder to handle user data entry and manage state for name and email. The component will store the data in localStorage so that it persists even after a page refresh or browser restart.
1//UserForm.tsx
2
3import React, { useEffect, useState } from "react";
4
5interface UserData {
6  name: string;
7  email: string;
8}
9
10function UserForm() {
11  const [name, setName] = useState<string>("");
12  const [email, setEmail] = useState<string>("");
13  const [userData, setUserData] = useState<UserData | null>(null);
14
15  const addUserData = (e: React.FormEvent) => {
16    e.preventDefault(); // Prevent the default form submission behavior
17    localStorage.clear(); // Clears all the data
18    const userData = {
19      name,
20      email,
21    };
22    localStorage.setItem("userInfo", JSON.stringify(userData));
23    setName("");
24    setEmail("");
25  };
26
27  const removeUserData = () => {
28    localStorage.removeItem("userInfo");
29    setUserData(null);
30  };
31
32  const getUserData = () => {
33    const storedUserInfo = localStorage.getItem("userInfo");
34    if (storedUserInfo) {
35      const userInfo = JSON.parse(storedUserInfo);
36      setUserData(userInfo);
37    }
38  };
39
40  useEffect(() => {
41    getUserData();
42  }, []);
43
44  return (
45    <div className="user-form-container">
46
47      <form onSubmit={addUserData} className="user-form">
48      {userData && (
49        <>
50          <div className="user-name">
51            Name: <p>{userData.name}</p>
52          </div>
53          <div className="user-email">
54            Email: <p>{userData.email}</p>
55          </div>
56        </>
57      )}
58        <div className="user-input-group">
59          <h1>Name</h1>
60          <input
61            placeholder="Name"
62            value={name}
63            onChange={(e: React.ChangeEvent<HTMLInputElement>) =>
64              setName(e.target.value)
65            }
66          />
67        </div>
68        <div className="user-input-group">
69          <h1>Email</h1>
70          <input
71            placeholder="Email"
72            value={email}
73            onChange={(e: React.ChangeEvent<HTMLInputElement>) =>
74              setEmail(e.target.value)
75            }
76          />
77        </div>
78        <div className="button-group">
79          <button type="submit" className="add-button">
80            Add User Data
81          </button>
82          <button type="button" onClick={removeUserData} className="remove-button">
83            Remove User Data
84          </button>
85        </div>
86      </form>
87    </div>
88  );
89}
90
91export default UserForm;
92
4.Integrating the Form into the App:
Now, we’ll import the UserForm component into the main App.tsx file. This component will render the form UI and persist the user data.
1//App.tsx
2import React from "react";
3import UserForm from "./components/UserForm";
4
5function App() {
6  return (
7    <div className="App">
8      <header className="App-header">
9        Persisting React state in Localstorage
10      </header>
11
12      <UserForm />
13    </div>
14  );
15}
16
17export default App;
18
Here’s a detailed breakdown of the above code and how localStorage handled the data in a react.
Storing data in the LocalStorage:
When the user submits the form, the addUserData function is called. This function stores the name and email in the browser’s localStorage under the key "userInfo".
1//Store data in the LocalStorage
2
3const addUserData = (e: React.FormEvent) => {
4       e.preventDefault(); // Prevent the default form submission behavior
5       localStorage.clear(); // Clears all the data
6       const userData = {
7              name,
8              email,
9        };
10    LocalStorage.setItem("userInfo", JSON.stringify(userData));
11       setName("");
12       setEmail("");
13};
14- going to give one a clean slate when it comes to storing data but keep in mind that it also blows away everything else stored in localStorage, not just the user-related ones.
- Next is the creation of a user data object that simply holds values of name and email properties which are typically acquired from either the form fields or through React state variables.
- The next step is to save this userData object into localStorage using its localStorage.setItem() method. As localStorage can only persist strings, this userData object must be converted into a JSON string via JSON.stringify().
- Now all that is left is to have the user's information safely stored inside localStorage-keyed under "userInfo". Therefore, it could be retrieved later even when the user closes or refreshes the page.
- After saving it in localStorage, the function calls setName("") and setEmail("") in order to clear these input fields, effectively resetting the name and email state variables back to empty strings. That will ensure that the form fields are empty when completed.
1//Retrieve data in the LocalStorage
2
3const getUserData = () => {
4    const storedUserInfo = localStorage.getItem("userInfo");
5    if (storedUserInfo) {
6          const userInfo = JSON.parse(storedUserInfo);
7          setUserData(userInfo);
8      }
9};
10
We retrieve the stored user data using the getUserData function, which runs on component mount thanks to useEffect(). If the data exists, it is displayed in the UI.
- command is given: localStorage.getItem("userInfo"). This would get the data saved under the key "userInfo".
- If no data is stored against the key "userInfo", then the stored UserInfo will be Null. Hence we will handle such a case next.
- If storedUserInfo isn't null then there will be a saved User's references. As all the data is saved in localStorage as a string, we have to convert them back into an object by using the JSON.parse() method.
- Now we have a userInfo object. Next, we will set the values using setUserData with these values.
Remove the data from the LocalStorage:
Having stored some user data in localStorage, there can be situations requiring it to be deleted, for instance, when a user logs out or when a form is reset or cleared. The removeUserData function shows how to remove certain specific data from localStorage targeting a specific key. Let's break this down:
1//Remove data in the LocalStorage
2
3const removeUserData = () => {
4    const storedUserInfo = localStorage.removeItem("userInfo");
5    setUserData(null);
6};
7- localStorage.removeItem("userInfo") is the function that removes the value stored using the key "userInfo" from localStorage.
- This localStorage.removeItem("UserInfo") will remove the item corresponding to the userInfo key from the local storage of the browser. Instead of localStorage.clear() which clears everything, it is better and smarter to also have the particular data corresponding to the "userInfo" key and does not affect other categories of data stored. The integrity of the remaining data will be intact and at the same time, it is a secure way.
Use Cases:
- Logging Out: When a user logs out of the application, you may want to clear their data from local storage for security reasons.
- Resetting Form: If the user resets a form or decides to start over, you can remove their previously entered data from localStorage.
Conclusion:
LocalStorage is one of the most efficient features various React applications could use to store and access data in a user's web browser. Using localStorage, applications can keep information about users or the session, even when the page is refreshed or when the browser is closed, rendering users' experience more seamless and personalized. Such features do not just improve how an application works, they also add to its user-friendliness and drive the potential for interactive and dynamic web applications. Ideal utilization of localStorage would contribute largely to user satisfaction and engagement level.