Google Analytics with Liferay Client Extension

Introduction
Google Tag Manager (GTM) is a powerful tool that simplifies the process of adding, managing, and deploying marketing and analytics tags on your website without requiring constant updates to the website’s code. It allows you to manage all your tags (like Google Analytics, Facebook Pixel, and other third-party scripts) in one place, without having to rely on a developer for every change.
In Liferay, adding GTM to your site can help you track important user interactions, optimize marketing efforts, and improve your site’s performance without the need to modify the core codebase. This blog will guide you through the steps to implement GTM in a Liferay environment using both the <script> and <noscript> tags.
Prerequisites
- Liferay 7.4 DXP
- Java 11
Steps to Add Google Tag Manager
In this guide, we are using Liferay Client Extensions to add Google Tag Manager (GTM) without modifying the theme or requiring direct access to the HTML head. This method allows you to easily manage and deploy GTM across your Liferay pages.
Create a GTM Account
- If you don’t already have a GTM account, go to the Google Tag Manager website.
- Sign in with your Google account and create a new GTM container. A container holds all the tags for your website or app.
- Once the container is created, Google will provide you with two pieces of code: the <script> tag for the <head> section and the <noscript> tag for the <body> section.
Obtain the GTM Code
You will receive two snippets from Google:
- The first code (JavaScript) goes inside the <head> section of your site:
1<!-- Google Tag Manager →
2
3< script >
4   (function (w, d, s, l, i) {
5      w[l] = w[l] || [];
6      w[l].push({
7         'gtm.start': new Date().getTime(),
8         event: 'gtm.js'
9      });
10      var f = d.getElementsByTagName(s)[0],
11         j = d.createElement(s),
12         dl = l != 'dataLayer' ? '&l=' + l : '';
13      j.async = true;
14      j.src = 'https://www.googletagmanager.com/gtm.js?id=' + i + dl;
15      f.parentNode.insertBefore(j, f);
16   })(window, document, 'script', 'dataLayer', 'GTM-XXXXXXX');
17</script>
18
19<!-- End Google Tag Manager -->- The second code (for users with disabled JavaScript) goes right after the <body> tag
1//<!-- Google Tag Manager (noscript) -->
2
3var noscriptTag = document.createElement('noscript');
4
5var iframeTag = document.createElement('iframe');
6iframeTag.src = "https://www.googletagmanager.com/ns.html?id=GTM-NHWWPG";
7iframeTag.height = "0";
8iframeTag.width = "0";
9iframeTag.style.display = "none";
10iframeTag.style.visibility = "hidden";
11
12noscriptTag.appendChild(iframeTag);
13
14document.body.insertAdjacentElement('afterbegin', noscriptTag);
15
16//<!-- End Google Tag Manager (noscript) -->
Add the GTM Script in Liferay
There are multiple ways to add GTM code to your Liferay site, depending on your environment and permissions. Here’s how to do it using Client Extension in Page Settings.
- How to add the first code (JavaScript)
- Create a file with .js extension using any text editor and remove the <script> tag.
1(function (w, d, s, l, i) {
2      w[l] = w[l] || [];
3      w[l].push({
4         'gtm.start': new Date().getTime(),
5         event: 'gtm.js'
6      });
7      var f = d.getElementsByTagName(s)[0],
8         j = d.createElement(s),
9         dl = l != 'dataLayer' ? '&l=' + l : '';
10      j.async = true;
11      j.src = 'https://www.googletagmanager.com/gtm.js?id=' + i + dl;
12      f.parentNode.insertBefore(j, f);
13 })(window, document, 'script', 'dataLayer', 'GTM-XXXXXXX');- Log in to Liferay as an administrator.
- Upload the file in document and media and copy the path of that file.
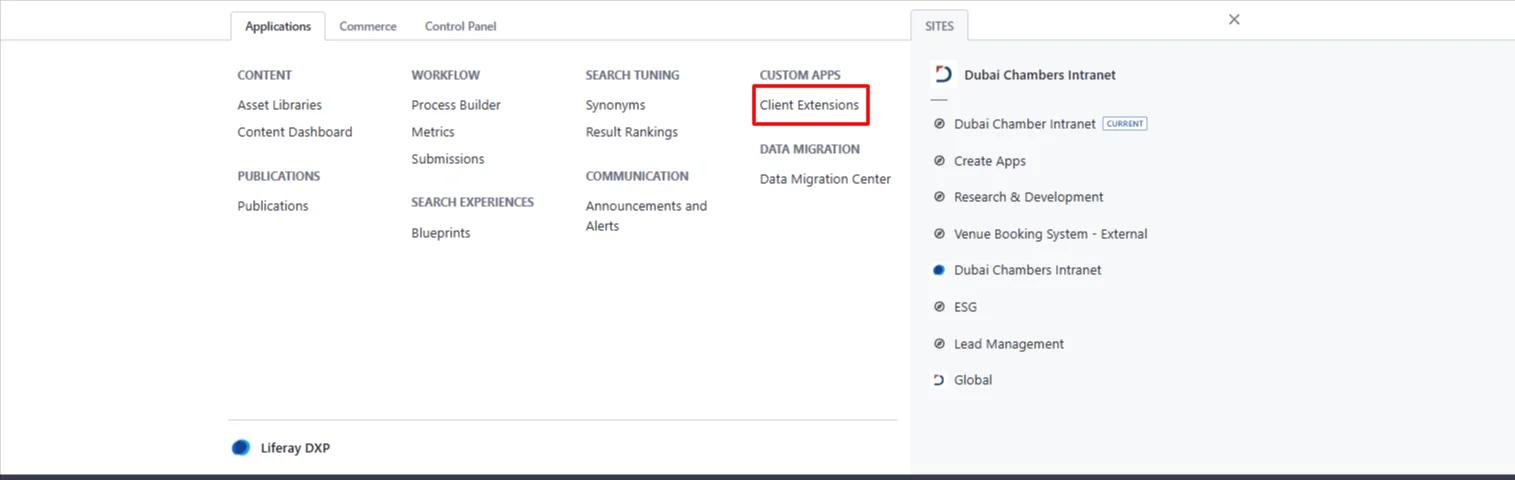
- Select client extension from Global Menu.
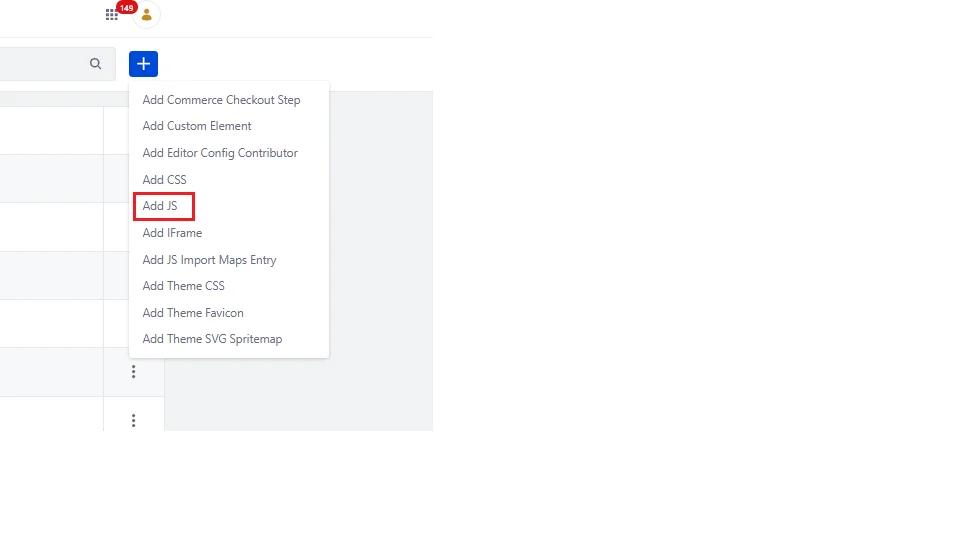
- Create JS client extension by selecting “Add JS”.
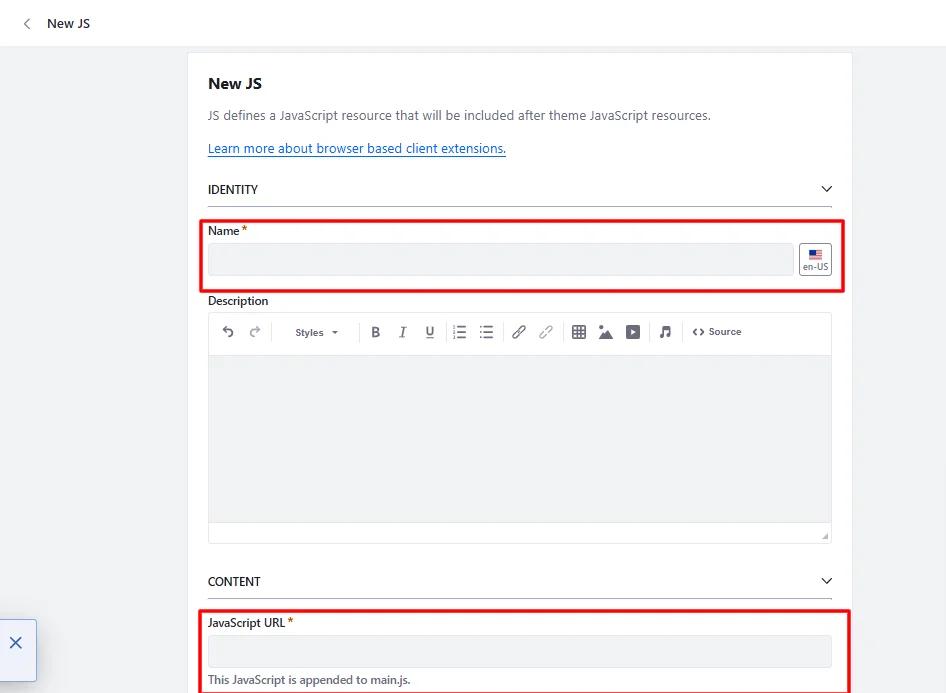
- Give the name and URL that we copied from document ad media.
- Save the client extension.
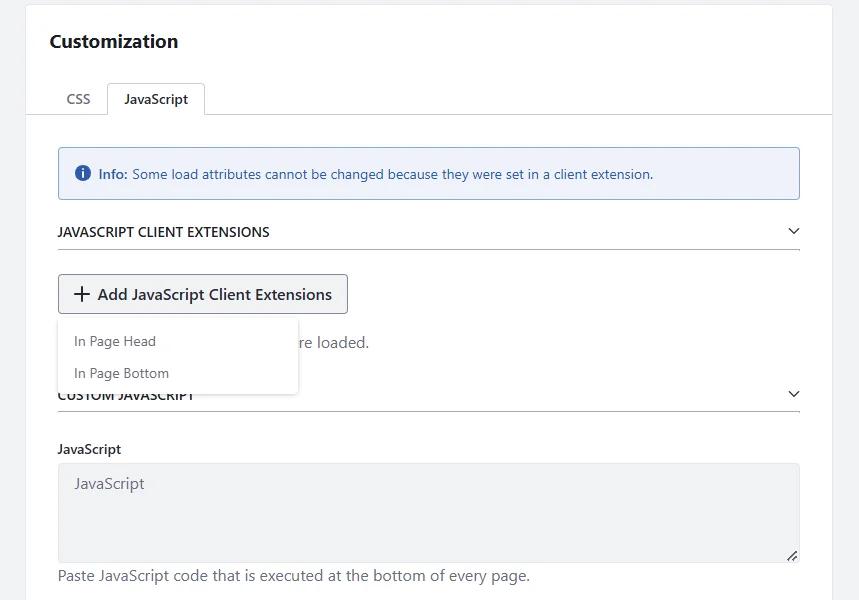
- Open the Page settings and scroll down to javascript extension section.
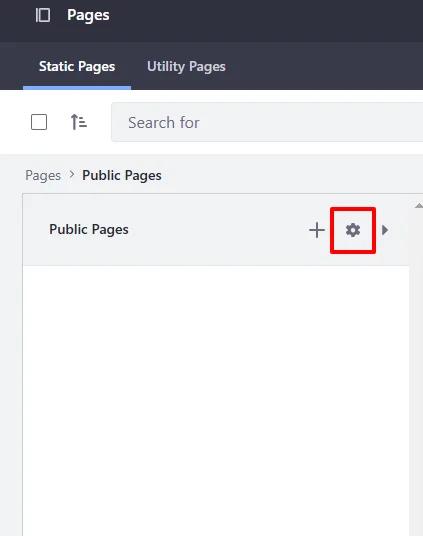
- Add the client extension in page head.
- The second code (for users with disabled JavaScript)
- To add the <noscript> part, inject it using JavaScript.
1//<!-- Google Tag Manager (noscript) -->
2
3var noscriptTag = document.createElement('noscript');
4var iframeTag = document.createElement('iframe');
5iframeTag.src = "https://www.googletagmanager.com/ns.html?id=GTM-NHWWPG";
6iframeTag.height = "0";
7iframeTag.width = "0";
8iframeTag.style.display = "none";
9iframeTag.style.visibility = "hidden";
10
11noscriptTag.appendChild(iframeTag);
12
13document.body.insertAdjacentElement('afterbegin', noscriptTag);
14
15//<!-- End Google Tag Manager (noscript) -->- Follow the same steps from 1 to 8 as mentioned for the first code (JavaScript).
- Add the client extension in the page body.
- Save the changes.
Conclusion
Adding Google Tag Manager to your Liferay site is a straightforward process that empowers you to manage tags and tracking more efficiently. Whether you use Liferay’s Custom Scripts, Fragments, or theme customization, implementing GTM ensures you’re able to track and optimize user behavior with minimal code changes.
By following the steps in this guide, you can have GTM up and running quickly, allowing for more flexibility in tracking, marketing, and analytics.