DotNet Client Extension with Liferay

Introduction
The majority of companies today integrate various technologies in the software world. To operate these services, they were able to relate well with one another. Liferay 7.4 is a technology that allows developing websites, portals, and digital experiences. It also supports the use of REST APIs that assist other systems in interacting with it.
.NET applications can be connected to Liferay 7.4 by a .NET Client Extension. It describes itself as a bridge, an aid that allows the engineers of .NET to avail the capabilities of Liferay, including user management, content management, objects, and workflow management, in their non-Java projects.
Liferay-Layers This extension is based on the principle of secure API calls made via the REST protocol, and this implies that your .NET application is able to exchange data with Liferay without being constrained by its internal design. It assists in an easy and effective collaboration of your .NET application and Liferay.
Prerequisites
- Liferay DXP/Portal 7.x
- Basic knowledge of Liferay Workspace
- Understanding of Liferay’s Headless APIs
- Code editor or IDE (Eclipse, IntelliJ IDEA, Visual Studio, or other developer tools)
Environmental Requirements
- Running instance of Liferay Portal or DXP
- .NET SDK (version 6.0 or higher)
Why Use a DotNet Client Extension?
A DotNet Client Extension makes it easy for .NET developers to connect their applications with Liferay 7.4. Here’s why it’s useful:
- Works across platforms: You can easily connect your existing .NET systems with Liferay services.
- Keep your main logic in .NET: Use Liferay’s APIs without changing your main .NET code or structure.
- Scalable and flexible: Build small, independent microservices that communicate with Liferay without overloading your main system.
- Secure communication: Use OAuth2 or API tokens to safely connect with Liferay’s APIs.
- Best on enterprise apps: Useful to connect the backend of Liferay with .NET-based systems such as ERP, CRM, or HR systems or analytics.
Simply put, a DotNet Client Extension assists you in extending the features of Liferay with the help of .NET, in a safe and easy way, and without affecting the inner code of Liferay.
How to Integrate .NET Client Extension with Liferay?
In order to use a .NET Client Extension with Liferay 7.4, you have to initially establish a connection between your .NET application and the REST APIs of Liferay. This allows your .NET application to carry on safe and effective operations of obtaining users and controlling content and processes.
Step 1: Set Up Your Environment
Make sure you have the following ready before starting :
- A running instance of Liferay 7.4 (Portal or DXP)
- .NET SDK (6.0 or higher) installed
Step 2: Create a new ASP.NET Core Web API project(Using Terminal)
1dotnet new webapi -n dotnet-api-client-extension
2cd dotnet-api-client-extension
Step 3: Add necessary NuGet packages
1dotnet add package Microsoft.AspNetCore.Authentication.JwtBearer
2dotnet add package System.IdentityModel.Tokens.Jwt
3dotnet add package Microsoft.IdentityModel.Tokens
4dotnet add package Newtonsoft.Json
Step 4: Configure appsettings.json
1{
2 "Logging": {
3   "LogLevel": {
4     "Default": "Information",
5     "Microsoft.AspNetCore": "Warning"
6   }
7 },
8 "AllowedHosts": "*",
9 "ReadyPath": "/ready",
10 "Domains": [ "http://localhost:58084", "http://localhost:8080", "http://localhost:5173" ],
11 "Liferay": {
12     "MainDomain": "localhost:8080",
13     "ServerProtocol": "http",
14     "OAuthAppExternalReferenceCode": "dotnet-oauth-application-user-agent",
15     "OAuthJWKSUri": "/o/oauth2/jwks"
16   }
17}
Step 5: Create a client-extension.yaml file
1assemble:
2   - include:
3         - "**/*.cs"
4         - appsettings.json
5dotnet-oauth-application-user-agent:
6   .serviceAddress: localhost:58084
7   .serviceScheme: http
8   name: DotNet OAuth Application User Agent
9   scopes:
10       - Liferay.Headless.Admin.Workflow.everything
11   type: oAuthApplicationUserAgent
12dotnet-object-action-1:
13   name: DotNet Object Action 1
14   oAuth2ApplicationExternalReferenceCode: dotnet-oauth-application-user-agent
15   resourcePath: /dotnet/object/action/1
16   type: objectAction
Step 6: Configure CORS and JWT Middleware
1using Microsoft.AspNetCore.Authentication.JwtBearer;
2using Microsoft.IdentityModel.Tokens;
3using System.Net.Http.Json;
4using System.Text.Json;
5
6var builder = WebApplication.CreateBuilder(args);
7var config = builder.Configuration;
8
9// Configure CORS
10builder.Services.AddCors(options =>
11{
12 options.AddPolicy("AllowLiferay", policy =>
13 {
14 policy.WithOrigins(config.GetSection("Domains").Get<string[]>())
15 .AllowAnyHeader()
16 .AllowAnyMethod();
17 });
18});
19
20// Add JWT authentication
21builder.Services.AddAuthentication(JwtBearerDefaults.AuthenticationScheme)
22 .AddJwtBearer(options =>
23 {
24 options.Events = new JwtBearerEvents
25 {
26 OnMessageReceived = context =>
27 {
28 var authHeader = context.Request.Headers["Authorization"].ToString();
29 if (!string.IsNullOrEmpty(authHeader) && authHeader.StartsWith("Bearer "))
30 {
31 context.Token = authHeader["Bearer ".Length..].Trim();
32 }
33 return Task.CompletedTask;
34 },
35 OnTokenValidated = async context =>
36 {
37 var httpClient = new HttpClient();
38 var liferayConfig = config.GetSection("Liferay");
39 var jwksUri = $"{liferayConfig["ServerProtocol"]}://{liferayConfig["MainDomain"]}{liferayConfig["OAuthJWKSUri"]}";
40
41 var jwksResponse = await httpClient.GetFromJsonAsync<JsonElement>(jwksUri);
42
43 },
44 OnAuthenticationFailed = context =>
45 {
46 context.Response.StatusCode = 401;
47 return Task.CompletedTask;
48 }
49 };
50
51 options.TokenValidationParameters = new TokenValidationParameters
52 {
53 ValidateIssuer = false,
54 ValidateAudience = false,
55 ValidateLifetime = false,
56 ValidateIssuerSigningKey = true
57 };
58 });
59
60builder.Services.AddControllers();
61
62var app = builder.Build();
63
64app.UseCors("AllowLiferay");
65app.UseAuthentication();
66app.UseAuthorization();
67
68app.MapGet(config["ReadyPath"], () => "READY");
69
70app.MapPost("/dotnet/object/action/1", async (HttpContext ctx) =>
71{
72
73 var json = await ctx.Request.ReadFromJsonAsync<object>();
74 Console.WriteLine(json);
75 return Results.Json(json);
76});
77
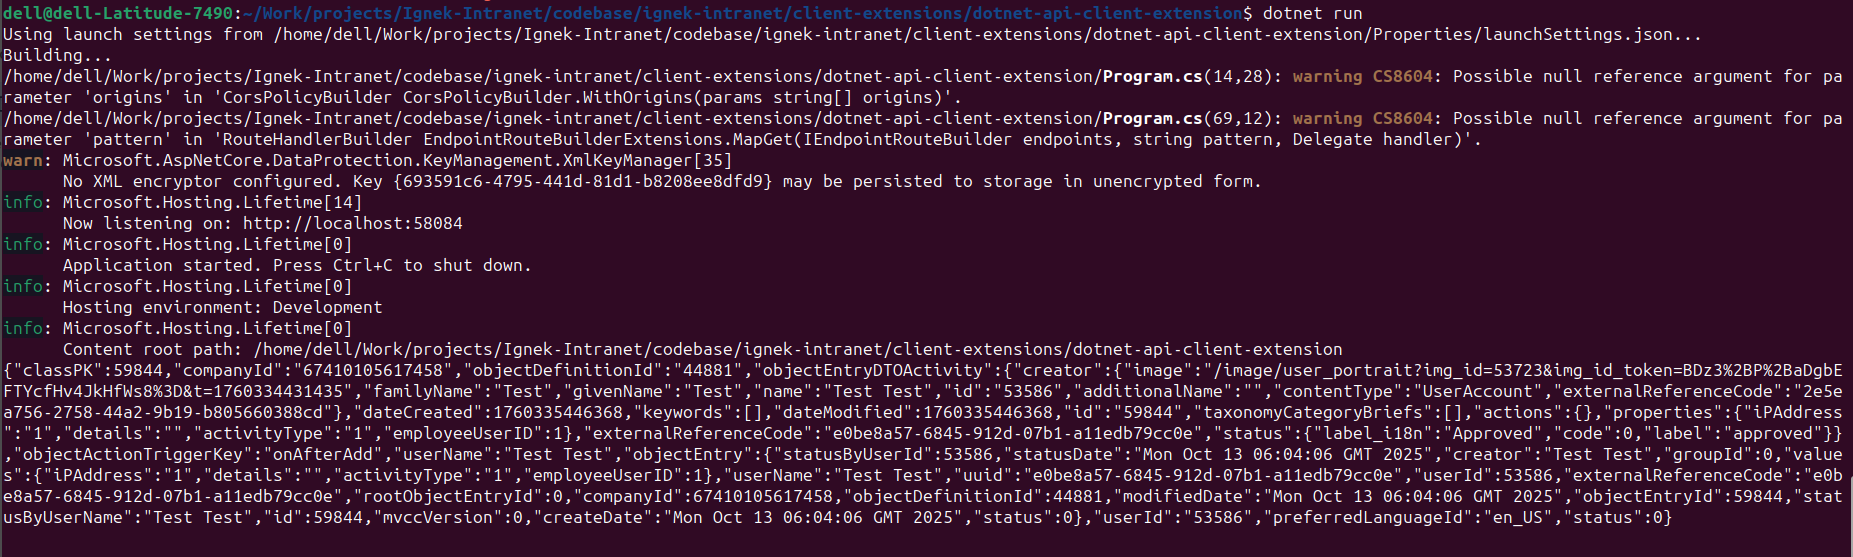
78app.Run();Step 7: Run the API
1dotnet run- Test /ready → should return "READY".
- Test /sample/object/action/1 with JWT from Liferay → should accept and return the JSON.
Conclusion
By using a .NET Client Extension along with Liferay, one can easily connect Liferay with .NET-based applications. Developers are also able to use Liferay with their preferred technology stack using secure OAuth2 authentication and REST APIs, and with all the capabilities provided by Liferay. This solution eases the process of integrating the enterprises and advances the scale, as well as the clean architecture, which enables both systems to cooperate with one another effectively and steadily.